AFO141 - SSP Report generator
141.1 Introduction
141.1.1 What is SSP?
SSP is V-smart's integrated, flexible and powerful report generator. It uses extensively one of V-smart's key mechanisms, -profiles-, exploiting fully one of the system's main principles, -“define once, use many times”.
The main characteristics are:
|
ü |
SSP is an integrated solution for selecting data. |
|
ü |
SSP is an integrated solution for sorting data. |
|
ü |
SSP is an integrated solution for publishing data. |
|
ü |
SSP is an integrated solution for generating statistics. |
|
ü |
SSP links directly to Office and can export data in different formats (e.g. HTML, XML or ASCII); data is immediately available in Word or Excel for further manipulation, or in a browser. |
|
ü |
SSP is available for the following data types: bibliographic data, authority data, borrower data, holdings data, item data (including deleted items), supplier data, order data, subscription data, bibliographic work file data, and authority work file data. |
|
ü |
SSP can be used in two modes, one called private mode and one called shared mode; in shared mode, profiles and savelists are shared between users of the system. |
When compared to external report generators, the module has the following benefits.
|
ü |
SSP has the same interface as the other V-smart modules; This has a number of additional benefits: [a] no additional costs for software licenses; [b] no additional costs for software installation; [c] no additional costs for training in other tools. |
|
ü |
Without knowledge of a query tool the most complex selections can be made; e.g. the ability to use nested Boolean combinations and pattern matching without specific technical knowledge; real life experience shows that even non technical users of the application are able to use these sophisticated features. |
|
ü |
Links between files are created automatically, again showing that SSP can be used with only limited knowledge of the file design. |
|
ü |
SSP is integrated in the core of V-smart and is not just an add-on application; this implies that the results of selections are available within the application. The result lists offer multiple capabilities for users of the system; examples are: [a] the facility to jump quickly from one record to another; [b] the facility to export records and integrate them in the WebOpac; [c] the facility to use data for global change purposes. |
|
ü |
SSP results are available within the application, but can be exported. |
Overview of functions
SSP (which stands for Select – Sort – Publish) is V-smart's report generator. Its core functionality includes selection, sorting and publishing, statistical reporting and savelist management. To support this functionality SSP also provides a number of tools that can be used within the core functionality.
SSP management includes:
· Savelist management
· Selection management
· Sorting management
· Publishing management
· Statistics management
· Statistics publishing management
· Class management [formatting styles]
· Grouping table management [tables for grouping data]
· Document texts
· Page texts
· Process management
Private and non private (i.e. common) mode
SSP has two modes: a private and a non private (common) mode. In private mode, all information is stored under the user's user ID. In common mode, all information is stored under a common, fictitious user ID.
The following screen shot shows the start menu of the SSP module:

141.1.2 Selections
SSP supports a wide range of simple and complicated query facilities, using V-smart's standard interface.
|
ü |
Selections are stored in profiles so that they can be used again and again. |
|
ü |
Selections can be run online, as batch or in memory mode (allowing the facility to schedule selections at recurring times, e.g. every Monday, every first day of the month, on a specific day, etc.). |
|
ü |
Selection profiles can be copied, locked (to protect against undesired changes), modified or deleted at all times. |
|
ü |
The number of selection criteria in a selection profile is virtually unlimited. |
|
ü |
Selection criteria can be combined using the Boolean operators AND, OR and NOT. |
|
ü |
SSP supports nested Boolean combinations. |
|
ü |
Virtually all data elements are available for selection purposes. Just a few examples to illustrate this; for bibliographic formats every indicator, subfield and field is available for selection purposes (for Marc21 there are more than 2700 criteria, for Unimarc more than 2500, for borrower records more than 300, etc.). |
|
ü |
For bibliographic data and for authority data the system allows selections on user defined “data elements” (such as “title”, “author”, etc.), which completely hides the structure of the bibliographic format and replaces it by user-friendly, user-defined “logical” concepts. |
|
ü |
SSP supports the following operators: equal to, bigger than, smaller than, contains, follows, defined, of a certain format and of a certain pattern, and the negative counterparts of these operators. |
|
ü |
Selections can evaluate data “as is” (i.e. without transformations) or with transformations (e.g. compare data in uppercase). |
|
ü |
SSP supports sophisticated pattern matching, allowing matching on data type, data length and string occurrence (a not so relevant example that illustrates the sophistication: “give me all borrowers whose name begins with a lowercase character, is five characters long and ends with the character “X'”). |
|
ü |
Data from different data files can be combined in one selection. |
141.1.3 Sorting
SSP can sort records in savelists on (a combination of) virtually every available data element, using V-smart's standard interface.
|
ü |
Sorting criteria are stored in profiles, so that they can be used again and again. |
|
ü |
Sorting can be done online, as batch or in memory mode (allowing the facility to schedule sorting at recurring times, e.g. every Monday, every first day of the month, on a specific day, etc.). |
|
ü |
Sorting profiles can be copied, locked (to protect against undesired changes), modified or deleted at all times. |
|
ü |
Virtually all data elements are available for sorting purposes. Just a few examples to illustrate this; for bibliographic formats every indicator, subfield and field is available for sorting purposes (for Marc21 there are more than 2700 criteria, for Unimarc more than 2500, for borrower records more than 300, etc.). |
|
ü |
Up to five sorting criteria can be combined in one profile. |
|
ü |
For repeatable data sorting can be limited to a specific number (e.g. only sort on the first author, or on all authors, etc.). |
|
ü |
Sorting can be done on either “raw” data (i.e. the data that is stored in the database) or on data that is manipulated via a grouping table (which allows e.g. grouping of criteria). |
141.1.4 Publishing
SSP can publish data in multiple formats, using wizards to create the reports. Using V-smart's standard interface, reporting formats can also be created manually.
|
ü |
Publishing lay-outs are stored in profiles, so that they can be used again and again. |
|
ü |
Publishing can be done online or in batch mode. |
|
ü |
Publishing profiles can be copied, locked (to protect against undesired changes), modified or deleted at all times. |
|
ü |
Virtually all data elements are available for publishing purposes. Just a few examples to illustrate this; for bibliographic formats every indicator, subfield and field is available for publishing purposes (for Marc21 there are more than 2700 criteria, for Unimarc more than 2500, for borrower records more than 300, etc.). |
|
ü |
For bibliographic data and for authority data the system allows selections on user defined “data elements” (such as “title”, “author”, etc.), which completely hides the structure of the bibliographic format and replaces it by user-friendly, user-defined “logical” concepts; this also allows for publishing data in complicated formats such as ISBD, while at the same time offering the ability of non-standard, customized punctuation. |
|
ü |
Publishing profiles can be defined using a wizard or manually. |
|
ü |
A virtually unlimited number of criteria can be combined in one profile. |
|
ü |
SSP can publish either “raw” data (i.e. the data that is stored in the database) or data that is manipulated via a grouping table (which allows e.g. grouping of criteria). |
|
ü |
Data can be published in multiple formats: ASCII (text), delimited, HTML or (in some cases) XML. |
|
ü |
Data can be sent to multiple devices (printers, printer spooler, files) and applications (Word, Excel, browsers, email), etc. |
|
ü |
SSP supports a direct link to Office, allowing data to be exported by just a few clicks of the mouse. |
Output in text (ASCII) format supports a limited number of formatting features. Very complicated formatting can better be done in applications optimized for that purpose.
|
ü |
Data can be published in columns or tagged (using labels). |
|
ü |
Document headers and footers can be added to any profile. |
|
ü |
Page headers and footer can be added to any profile. |
|
ü |
Definitions of page format and column width are possible. |
|
ü |
Easy export to Word for further (complex) formatting. |
|
ü |
Easy export to mail merge. |
Output in HTML supports a set of formatting features, producing HTML code without having to know the HTML syntax.
|
ü |
Data can be published in columns or tagged (using labels). |
|
ü |
Document headers and footers can be added to any profile. |
|
ü |
The document can be published in a browser by just a few clicks of the mouse and without any knowledge of HTML. |
|
ü |
Formatting of data includes font name, font size, font style (bold, italics, underline), alignment, colours and border styles. |
Note
HTML type of output cannot be sent to the printer via Vsmart; HTML Types should be first sent to a file, then opened from there.
In any publishing format data can be manipulated in multiple ways.
|
ü |
Text and punctuation can be added before and after the data. |
|
ü |
Automated transformations of data such as case changes (i.e. transformations to or from uppercase), restrictions on data length, removal of data (e.g. publish only a certain part of a field), restrictions on repeating data (e.g. publish only the first author in a bibliographic record), replacing empty data, etc. |
|
ü |
Automated date and time formatting. |
|
ü |
Automated cleaning of data (e.g. removal of superfluous blanks). |
|
ü |
Data can be grouped automatically using either automatic or user-defined grouping tables; this allows e.g. grouping of borrowers on age or age categories, allows automatic transformations of dates into months or years, or for that matter any user-defined transformation of text. |
141.1.5 Statistics
SSP supports, as a separate option, the facility to generate statistical reports.
|
ü |
Statistical reporting is stored in profiles, which can be used again and again. |
|
ü |
Generating statistics can be done online or in batch mode. |
|
ü |
Statistical profiles can be copied, locked (to protect against undesired changes), modified or deleted at all times. |
|
ü |
Virtually all data elements are available for statistical purposes. Just a few examples to illustrate this; for bibliographic formats every indicator, subfield and field is available for statistical purposes (for Marc21 there are more than 2700 criteria, for Unimarc more than 2500, for borrower records more than 300, etc.). |
|
ü |
For bibliographic data and for authority data the system allows statistical reports on user defined “data elements” (such as “title”, “author”, etc.), which completely hides the structure of the bibliographic format and replaces it by user-friendly, user-defined “logical” concepts. This also allows for publishing data in complicated formats such as ISBD, allowing customized punctuation. |
|
ü |
The system can generate so-called “snapshots”, which are in fact a copy of data at a certain point in time; the snapshot can then be used later for generating statistical reports. |
|
ü |
SSP can publish either “raw” data (i.e. the data that is stored in the database) or data that is manipulated via a grouping table (which allows e.g. grouping of criteria). |
|
ü |
Data can be published in multiple formats: ASCII (text), delimited, HTML or XML. |
|
ü |
Data can be sent to multiple devices (printers, printer spooler, files) and applications (Word, Excel, browsers, email etc.). |
|
ü |
SSP supports a direct link to Office, allowing data to be exported by just a few clicks of the mouse. |
Note
Statistics that combine different transaction types with item ID based criteria such as materialtype, will result in an incorrect display.
E.g. statistics for loans and reservations must be generated separately.
141.1.6 Savelist management
Savelists are the system's technique for temporarily or permanently storing sorted or unsorted lists of records. Savelists are used throughout the system in a variety of applications, ranging from data import to global change and reporting. Savelists are flexible containers for manipulations with data of variable types. Not only are they available in lots of modules as data containers, they also have their own management tool, which allows for extensive manipulations of the records stored in the savelists.
The main features supported are:
|
ü |
Savelists can be created manually and automatically. |
|
ü |
Savelists can be combined using Boolean operators AND, OR and NOT. |
|
ü |
Savelists can be managed globally; this implies e.g. that they can be created, copied (also to other users of the system), deleted (individually or in groups), purged, locked (to protect against unwanted changes), unlocked or sorted. |
|
ü |
Savelists can be “exported to the web”, i.e. the contents of a savelist can be published in the WebOpac (this is done by incorporating them in a search tree), thus creating a bridge between back office and the WebOpac, and allowing the library to publish any ad hoc collections (savelists). |
|
ü |
Savelists can be used as part of global change, movement of items, authority management, cataloguing and other modules throughout the application. |
|
ü |
Savelists can be copied easily, including the ability to transform the type of the records in the savelist (e.g. copy a list of bibliographic records to a list of items that are attached to the bibliographic records in the original savelist). |
|
ü |
Records in savelists can be sorted on virtually every data element. |
|
ü |
Records in savelists can be published in multiple user-defined formats. |
|
ü |
Savelists can serve as the basis of new selections (i.e. search results can be refined with new selections). |
|
ü |
Records in savelists can be viewed from within the savelist in their “native interface”, i.e. borrower records give access to the borrower administration, authority records to authority management, etc. |
|
ü |
Records can be stored in savelists in multiple ways: [a] by running SSP selections, [b] by adding them manually, or [c] automatically (e.g. as part of data import, as part of the cataloguing workflow, etc.). |
|
ü |
Automatically created savelists are stored under user ID code of AAA, to track the first items added to a bibliographic record as well as new items added (by year and by month). The savelist AFVGPK contains a list of the bibliographic records which no longer contain a shelfmark (all items have been deleted). You can look at these savelist by chosing the option . |
141.1.7 Applications, data files and criteria available for SSP
SSP gives access to data from multiple so-called “applications”. These applications group types of data (such as “bibliographic”, “authorities”, “borrowers”, etc.). These applications then map to one or more data files, which contain the actual data.
SSP gives access to the following applications.
|
Application |
Wording |
|
Acq |
Orders |
|
AcqAWP |
Potentials |
|
AcqH |
Order headings |
|
Auth |
Authorities |
|
Bib |
Holdings for bibliographic descriptions |
|
Bind |
Binding sets |
|
Borr |
Borrowers |
|
BorrLoanHist |
Borrower loan history |
|
CircTrans |
Circulation transactions |
|
CRM |
Contact Management |
|
DD |
Data Dictionary |
|
DelBorr |
Deleted borrowers |
|
DelObj |
Deleted items |
|
DelObjTD |
Deleted item title data |
|
GateMgr |
Gate manangers |
|
Inv |
Invoices |
|
Issues |
Issues |
|
LocSet |
Shelfmark sets |
|
MRoutes |
Mobile routes |
|
MStops |
Mobile stops |
|
MVans |
Mobile vans |
|
MoveTrans |
Movement transactions |
|
NewObj |
New items (SDI) |
|
Obj |
Items |
|
PurAl |
Purchase Alerts |
|
RateReview |
Rate & Review |
|
SearchTrans |
Search actions |
|
StackReq |
Stack requests |
|
Subscr |
Subscriptions |
|
Supp |
Suppliers |
|
WebObj |
Web sessions |
|
WebReq |
Web requests |
The application DD (Data Dictionary) gives access to the data definitions that are used by SSP to give access to the data. It can be used to create overviews of available criteria (data elements).
Each of these applications corresponds with one or more data files. The following table serves only as an example.
|
Data file |
Application |
|
Smart format for authorities |
Auth |
|
Marc21 format for authorities |
Auth |
|
UniMarc format for authorities |
Auth |
|
Barcodes |
Obj |
|
Holdings per bibliographic record |
Bib |
|
VubisSmart Smart format |
Bib |
|
Marc21 format |
Bib |
|
UniMarc format |
Bib |
|
Borrowers |
Borr |
|
Borrower loan history |
BorrLoanHist |
|
Circulation transactions |
CircTrans |
|
Data Dictionary |
DD |
|
Deleted items |
DelObj |
|
Deleted items title data |
DelObjTit |
|
Movement history (per record/volume) |
Obj |
|
Movement transactions |
MoveTrans |
|
New items |
NewObj |
|
Orders |
Acq |
|
Order headings |
AcqH |
|
Search actions |
SearchTrans |
|
Subscriptions |
Subscr |
|
Suppliers |
Supp |
Note that this table is only an example. Especially with regard to the bibliographic and the authority formats, the system supports an unlimited number of possible variants (we have used Smart, Marc21 and Unimarc as examples of such formats).
Furthermore, note that a number of systems can give access to other types of data, depending on local settings and installed modules. An example of this is the module for libraries for the blind, which gives access to additional applications and data files.
See the next section for a description of the data dictionary concept.
141.1.8 The data dictionary concept
The SSP module uses a data dictionary that contains information about all the data elements that are accessible. This data dictionary describes the properties of each data element. These properties are characteristics such as:
· What is the name of the data element?
· What is its (language dependant) wording?
· Is it repeatable?
· What is its data type (e.g. String, Numeric, YesNo, Date, Time, DateAsString, TimeAsString, etc.)?
· And a number of technical characteristics that describe the location of the data element in the data files.
The system differentiates between the following data types:
|
Data type |
Description and examples |
Restrictions |
|
Authority |
A link to an authority record |
Only used for bibliographic and authority data |
|
Currency |
Currency (e.g. 45 or 45.50) |
|
|
Date |
Date stored in internal format |
|
|
DataAsString |
Date stored as a string (e.g. 10/09/1969) |
|
|
FileLink |
A reference to a file |
Only used for bibliographic and authority data |
|
Numeric |
A numeric value (1, 1.4, .23) |
|
|
ReferenceSlave |
Data retrieved from an authority record |
Only used for bibliographic and authority data |
|
String |
Any data that does not fall in any of the other categories |
|
|
Time |
Time stored in internal format |
|
|
TimeAsString |
Time stored as a string (e.g. 14:00) |
|
|
YesNo |
0 or 1 (0 = not true, 1 = true) |
|
You can use SSP to access the data elements and their descriptions on your system. Note however that this does not give access to the “technical” properties, but only to properties such as wording and data type.
In order to achieve this you must choose “Data dictionary” as the file when creating a selection profile.
How is the data dictionary created?
The data elements in the data dictionary are supplied by Infor in each new release. Note however that, for a number of data files, you can influence which criteria are included in the data dictionary. This is the case for:
· Bibliographic formats (as defined through AFO 151)
· Authority formats (as defined through AFO 152)
· Borrower definitions (as defined through AFO 482)
· Item definitions (as defined through AFO 469)
Each time you leave the overview screen of a format or definition in these AFOs, the system will “recompile” the data element definitions in the SSP data dictionary, which is optimized for retrieval purposes. Note that fields that are removed from a format or set to “not in use” are removed from the SSP data dictionary at compilation time.
141.1.9 Private versus shared mode
SSP can be used in two modes; private and shared mode. Private mode implies that all actions are executed in a private sandbox, i.e. private to the user ID (e.g. a selection profile that has been created is only available for the user who created it). Shared mode implies that results are visible to all users (e.g. a selection profile is shared amongst all users). To enable this functionality, the system provides two fictitious users:
· “General use” – all users can share work; profiles and savelists are visible to all users.
· “Examples” – each release is installed with a number of example profiles, which can be copied from this fictitious user to other users' environments.
Profiles of the user “Examples” cannot be modified.
Users can switch to these fictitious users on all overview screens of savelists and profiles (as described in the following sections).
Note furthermore that there are multiple options within SSP that allow users to copy their work to other users of the system. These options are described in the following sections.
Note that there is also a fictitious user “WebOpac savelists”, who can be used to look at the savelists that have been published to the web. If you switch to the overview of savelists for this user (using the “View savelists of user” option) you can view the savelists. If the currently logged in user has !SYS privileges and/or is the SYSPAS user, then the delete savelist option is also available to that user for deletion of WebOpac savelists.
141.1.10 Automatic links between files
Selections and other SSP activities can imply linking between files. A simple example of a selection query to illustrate this is the following: I want to retrieve all borrowers that live in Boston and that have checked out an item on August 17. This selection combines two criteria:
· A criterion from the borrower file: borrower address, place = Boston
· and
· A criterion from the item file: checkout date = August 17, 2004
The SSP data dictionary will create the link between the borrower and the item file automatically.
However, when linking from the circulation transactions file to the item file, one should be aware of the following. Because there are multiple links available, it is mandatory that an appropriate “linking criterion” is added to the list of selection criteria. The following table describes the available links from the circulation transactions file to the item file and the criteria that should be added to the selection, in order to make the linking mechanism work properly.
141.2 Savelist management
141.2.1 What are savelists and why use them?
Savelists are temporary containers of record IDs. In other words, they are used as temporary storage mechanism for record IDs, not for records. The contents of the savelist can be either unsorted or sorted.
It is important to realize that savelists do not contain the actual records. If a savelist is deleted, there are no consequences for the actual records.
Savelists can be used for a wide range of purposes. These include:
· Result lists from catalogue searches can be stored in a savelist.
· The system can run queries on the database and store the results in a savelist.
· The contents of a savelist can be exported to a file or to other applications.
· Savelists play an important role when moving records between authorities.
· Savelists play an important role in global change actions (e.g. the system can delete borrower records that are stored in a savelist).
· Savelists can be “exported to the web”, which implies that the records become accessible as specific hyperlinks in the WebOpac.
· Savelists can be used to switch quickly from one record to another (e.g. for maintenance purposes).
The following sample screen shot shows an overview of defined savelists:

141.2.2 The properties of savelists
A savelist has the following properties.
Name: The unique name (ID) of the savelist. It must be unique within the application.
User id: The user who created the savelist. Note that the system also provides a “fictitious” user “General use”, which is accessible by all users (i.e. the savelists are shared by all users).
Application: Each savelist belongs to a specific application. See the introduction of this chapter for an overview of applications and the associated data files.
Block status: Whether the savelist is accessible or not.
Comments: A free text comment string.
Created by: The user ID that created the savelist.
Creation date and time: The date and time on which the savelist was created.
Number of records: The number of records that are in the savelist.
Sort criteria 1 to 3: The identification of the sort criteria (a maximum of three sort criteria is supported).
Sorted: This flag indicates whether or not the records in the savelist have been sorted.
List of records: The actual list of record IDs which are stored in the savelist.
141.2.3 Managing savelists
Actions and tools for managing savelists
When managing savelists, the following actions and tools are available:
|
Option (button) |
Use this option to: |
|
Manual creation of savelists |
Create a new savelist. |
|
Deleting savelists |
Delete one or more savelists. |
|
Delete more savelists |
Delete one or more savelists based on date and/or the fact that there are no records in the savelist. |
|
Copy savelists |
Copy savelists to another name. Copy savelists to another user. Copy savelists to another application. |
|
View the content of savelists |
View the records that are stored in a savelist (i.e. to navigate to the detail screen). |
|
Memorize a savelist |
Memorize a savelist for further use in the cataloguing module (bibliographic or authorities). |
|
Change the properties of savelists |
Change the properties of a savelist (e.g. name or comments). Purge a savelist. Re-initialize a savelist. |
|
Publish savelists |
Publish the records in a savelist. Send the result to another application (e.g. to Word, Excel, a browser, a file, etc.). |
|
Sort savelists |
Sort the records in a savelist. |
|
Select from savelists |
Begin a selection based on the content of an existing savelist. |
|
Combine the content of two savelists |
Combine two savelists using Boolean AND, OR and NOT combinations. |
|
Global delete |
Delete records that are stored in a savelist (this is available for borrowers, bibliographic records and items). |
|
Export to the web |
Export a savelist to the web and to include it in a WebOpac search tree (“savelist to the web”). |
|
View the savelists of another user |
View savelists of another user. |
|
Filter the display of savelists |
Restrict the number of savelists that are displayed based on criteria such as application, size, creation date and others. |
|
Sort savelists |
Sort savelists in a specific order. |
|
Filter the display of records in a savelist |
Restrict the number of records in a savelist that are displayed based on the record IDs. |
|
View the records in a savelist |
Display details of the records that are stored in a savelist (usually this is done in the applications “native” interface; e.g. selection of a borrower records opens borrower administration, selection of an item opens item administration, etc.). |
|
Message to borrowers |
Send an SMS message to borrowers. |
|
Manually add records to a savelist |
Manually add records to a savelist |
We will describe a number of these actions in more detail in the next sections.
Workflow and organization of savelist management
Savelist management is organized on two main screens:
· The main (top level) screen displays a list of savelists and their most important properties (such as name, number of records, creation date, application, etc.).
· The detail (second level) screen displays the content of a savelist and allows direct access to these records in their native interface.
Most options are available on both screens, but not all. The following tables show an overview of which options are available on which screen.
Options available on the main screen
|
Shortcut |
Option |
|
* |
View records in list |
|
B |
Previous |
|
BOOL* |
Boolean relationships |
|
C* |
Copy savelist |
|
F |
Next |
|
G* |
Actions |
|
I |
New savelist |
|
L* |
Lock savelist |
|
M* |
Memorize savelist |
|
O |
Sort |
|
P* |
Change properties |
|
PW |
View savelists of a particular user |
|
R |
Filter |
|
S |
Delete several savelists |
|
S* |
Delete savelist |
|
UL* |
Unlock savelist |
|
V |
Refresh display |
|
W* |
Savelist to the web functionality |
Shortcuts that end with an asterisk (*) require the selection of a savelist.
Options available on the detail screen
|
Shortcut |
Option |
|
* |
Access to record |
|
B |
Previous |
|
C |
Copy savelist |
|
D |
Global delete |
|
F |
Next |
|
G |
Actions |
|
I |
Add record to list |
|
L |
Load records intodatabase |
|
M |
Memorize savelist |
|
P |
Change properties |
|
R |
Filter |
|
S |
Delete savelist |
|
S* |
Delete records from list |
|
V |
Change view |
|
W |
Savelist to the web functionality |
|
X |
Messages to borrowers |
|
Z |
Input from file (only valid for application "Items") |
Shortcuts that end with an asterisk (*) require the selection of a record in the savelist.
141.2.4 Creating a new savelist
Savelists can be created in multiple ways:
1. Manual creation of savelists: the user manually creates a savelist and copies records into it (e.g. by scanning item barcodes).
2. SSP creation of savelists: SSP is used to create a savelist (e.g. a selection or sorted results are stored in a savelist; savelists can be combined into a new savelist, etc.).
3. Automatic creation of savelists: the system automatically creates a savelist and copies records into it (there are multiple examples of this type: e.g. when loading records into the database; when manually creating new bibliographic records, etc.).
To create a new savelist click on the button. You can then define the following properties: savelist name, comments and application.
Note that the application you choose here only indicates what type of data (records) will be stored in the savelist (e.g. if you choose “Borrowers” as application, you can only store borrower records in the savelist).
141.2.5 Deleting savelists
There are two methods for deleting savelists:
1. Use the option to delete one or more savelists. The system will ask for confirmation.
2. Use the option to delete savelists based on a number of criteria that you can define. These criteria are either date or number of records. This way you can specify:
· Date: all savelists that have been created before this date will be removed from the list of savelists
· Whether or not empty savelists are to be retained.
Note that these delete options do not delete the actual data from the database. They only remove the savelist itself (e.g. if you have a savelist that contains fifty item records, the system does not delete the fifty items, but it deletes the savelist, which only contains references [links] to the actual item records).
141.2.6 Import items from file
You can fill savelists of the type “items” with items from a file. If you invoke this option, the system allows you to specify a file on your pc or in the network. The system will import the items from the file and store them into the savelist.
Note that the system does not import the actual data (i.e. it does not create item records).
This option can only be used to import items (and thus not for borrowers or other types of data).
Import files must have the following (very simple format): each item ID is stored on a new line. Lines are separated by <Carriage Return><Linefeed> (Windows) or <Linefeed> (Unix or Linux).
This feature's primary function is to import files created by handheld scanners or similar devices (e.g. as part of inventory control). This savelist can then be used for comparison with savelists created by SSP. [See the documentation on inventory control for more information.]
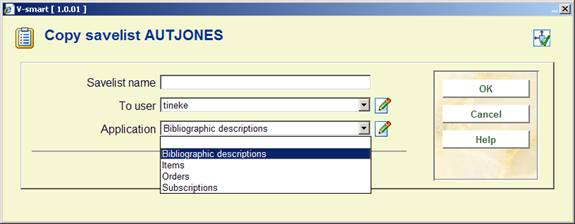
141.2.7 Copying savelists
The Copy Savelist feature can be used to copy savelists:
· To another name
· To another user
and/or
· To another application
Copying to another name will just create a duplicate savelist. Copying to another user will create the savelist for the other user. Copying to another application is a more advanced feature (see next section for a description).
Note that these copy functions can be combined (e.g. copy a savelist to another user and to another name).
Copying savelists to savelists of “another application”
When copying a savelist, the system allows copying the savelist to other “applications”. This implies e.g. that one can copy a list of bibliographic records to a list of items, a list of items to a list of borrowers, etc.
The following type changes are allowed:
|
Savelist of application: |
Can be copied to savelist of application: |
|
Authorities |
Authorities |
|
Bibliographic descriptions |
|
|
Bibliographic descriptions |
Bibliographic descriptions |
|
Items |
|
|
Orders |
|
|
Subscriptions |
|
|
Borrowers |
Borrowers |
|
Items |
|
|
Items |
Items |
|
Bibliographic descriptions |
|
|
Borrowers (current borrower) |
|
|
Borrowers (last borrower) |
|
|
Orders |
Orders |
|
Bibliographic descriptions |
|
|
Subscriptions |
Subscriptions |
|
Bibliographic descriptions |
|
|
Suppliers |
Suppliers |
When copying a savelist that contains bibliographic records to a savelist that contains items, the system will offer you the option to restrict the copy to the items of one or more institution/location combinations.

You can limit the item list to a specific range of institution/locations. The following formats are valid input:
|
* |
All institutions/locations (no restriction) |
|
A/B |
Institution A / location B |
|
A/* |
Institution A / all locations of that institution |
|
A/B,C/D,E/* |
Multiple values are separated by commas |
The system will copy only items that belong to the specified institutions and locations to the new savelist.
141.2.8 Change the properties of a savelist
The option can be used for multiple purposes:
· Modify the properties “name” and “comments”
· Re-initialize the savelist – if the “Delete all records” property is set to Yes, the system will re-initialize the savelist and remove all records previously stored in the savelist
· Purge the savelist – if the “Delete all non existing records” property is set to Yes, the system will remove from the savelist all records that no longer exist in the database
141.2.9 Memorize a savelist
The option to memorize a savelist is only valid for savelists of the applications “Bibliographic descriptions” and “Authorities”. It can be used to store a savelist ID in memory. This savelist ID can then later be used during the cataloguing process (e.g. to store records).
141.2.10 Combine the content of two savelists
Savelists can be combined using Boolean AND, OR and NOT operators. A savelist must be selected before this option is invoked. The system allows you to specify the following:
· The Boolean operator (AND, OR or NOT)
· The savelist that is to be combined with the selected one (note that the system will only allow selection of a savelist that has the same application as the one that was originally selected)
· The name of the savelist in which the result of the Boolean combination is to be stored (the resulting savelist)
· The comments that are to be added to this new savelist.
141.2.11 View the savelists of another user
To view the savelists of another user, the system allows access to savelists created by another user. Users with system privileges can access all other users' savelists. Other users can only access the savelists stored under the fictitious user “General use”.
141.2.12 Filter the display of savelists
The option can be used to restrict the number of savelists that are displayed. Especially when large numbers of savelists have been defined, this option enables you to restrict which ones are to be displayed.
Filtering can be done on:
· Creation date (created after / created before)
· Number of records in the savelist (more than n records / less than n records)
· Application
or by using a combination of these.
141.2.13 Sorting savelists
Savelists can be sorted on a combination of a maximum of three criteria, either in ascending or descending order.
The following criteria are available:
· Application (the application of the savelist)
· Comments (the comments attached to the savelist)
· Date (creation date)
· Name (the name of the savelist)
· Size (the number of records in the savelist)
For each criterion, ascending or descending order can be specified.
141.2.14 Manually add records to a savelist
The system allows records to be added to a savelist on a manual basis. This is done through identification of the records using the “native” interface of each application. The following table describes, for each application, how you can add one or more records to a savelist.
|
Application |
Wording |
How are records to be added? |
|
Acq |
Orders |
Not available. |
|
AcqH |
Order headings |
Not available. |
|
Auth |
Authorities |
Using the search facilities of AFO 111. Select one or more records; they will be added to the savelist. |
|
Bib |
Holdings for bibliographic descriptions |
Using the search facilities of AFO 112. Select one or more records; they will be added to the savelist. |
|
Borr |
Borrowers |
Use the borrower search screen of AFO 431. |
|
BorrLoanHist |
Borrower loan history |
Not available. |
|
CircTrans |
Circulation transactions |
Not available. |
|
DD |
Data Dictionary |
Not available. |
|
DelObj |
Deleted items |
Not available. |
|
DelObjTit |
Deleted item title data |
By entering item IDs. The system will display a text box that allows you to type or scan the item IDs; the items that have been typed or scanned are shown in a separate text box on the same form. |
|
MoveTrans |
Movement transactions |
Not available. |
|
NewObj |
New items |
Not available. |
|
Obj |
Items |
By entering item IDs. The system will display a text box that allows you to type or scan the item IDs; the items that have been typed or scanned are shown in a separate text box on the same form. |
|
SearchTrans |
Search actions |
Not available. |
|
Subscr |
Subscriptions |
Not available. |
|
Supp |
Suppliers |
Not available. |
In principle the manual adding process is a cyclical process, which is continued until you explicitly end it.
141.2.15 View the content of savelists
This function is used to view the contents of a savelist. The system displays the following information:
· The record ID
· Sort key 1
· Sort key 2
· Sort key 3
· The “primary record wording”
The structure of the record ID depends on the type of data (records) that is stored in the savelist. The following table shows how the record ID is structured for each of the available file types.
|
Application |
Record identified by |
|
Acq |
Database – RecordId – MetaInstitutionAcquisitions – OrderId |
|
AcqH |
MetaInstitutionAcquisitions – OrderId |
|
Auth |
Database - RecordId |
|
AuthWork |
Database - RecordId |
|
Bib |
Database - RecordId |
|
BibWork |
Database - RecordId |
|
Borr |
MetaInstitutionCirculation - BorrowerId |
|
BorrLoanHist |
MetaInstitutionCirculation - BorrowerId - RecordToken |
|
CircTrans |
TransactionDate - TransactionId |
|
DD |
DataElement |
|
DelObj |
Institution - Location – Date - ItemId |
|
DelObjTD |
MetaInstitutionCirculation - ItemId |
|
MoveTrans |
TransactionDate - TransactionId |
|
NewObj |
MetaInstitutionCirculation – Location – AcquisitionDate – UniqueRecordId - ItemId |
|
Obj |
MetaInstitutionCirculation - ItemId |
|
SearchTrans |
TransactionId |
|
Subscr |
Database – RecordId - MetaInstitutionSerials – SerialId |
|
Supp |
MetaInstitutionAcquisitions - SupplierId |
Sort keys are only displayed for savelists that are sorted. Unsorted savelists have no sort keys. Sorted savelists can have one, two or three sort keys.
The “primary record wording” is also dependent on the type of records in the savelist. The aim of the “primary record wording” is to show the most relevant information about the record. This is e.g. for a borrower the borrower name; for an item the “short” title; for a bibliographic record the title.
141.2.16 View the records in a savelist
Detailed information about each record in a savelist can be viewed if a record is selected. The detailed information is, in most cases, displayed using a so-called “native” interface (i.e. a standard function of the application is called to display the information, as SSP does not usually have its own display screens). The following table shows which functions are used to display detailed information about records in a savelist.
|
Application |
Interface used to display detailed information about records |
|
Acq |
AFO 211 – Overview screen of an order |
|
AcqH |
Not available |
|
Auth |
AFO 113 – Overview screen |
|
AuthWork |
AFO 113 – Overview screen |
|
Bib |
AFO 111 – Overview screen |
|
BibWork |
AFO 111 – Overview screen |
|
Borr |
AFO 431 – Overview screen |
|
BorrLoanHist |
AFO 431 – Overview screen |
|
CircTrans |
See below for more information |
|
DD |
See below for more information |
|
DelObj |
|
|
DelObjTD |
|
|
MoveTrans |
See below for more information |
|
NewObj |
AFO 423 - Overview screen |
|
Obj |
AFO 423 - Overview screen |
|
SearchTrans |
See below for more information |
|
Subscr |
AFO 321 – Overview screen of a subscription |
|
Supp |
AFO 241 – Overview screen |
As mentioned in the previous table, some applications do not have access to a “native” interface but have their own SSP interface. This is the case for data dictionary, circulation transactions, movement transactions and search transactions. When records are accessed, the system shows the detailed information in a pop-up window. The following section describes what information is displayed for each of these types of records.
141.2.17 Filter the display of records in a savelist
When displaying the content of a savelist the option enables filtering based on record IDs and sort keys. This implies that one can specify a filter value for each record ID and/or for each sort key. The system will then only display the records that begin with the defined filter(s).

141.2.18 Export to the web (“savelist to the web”)
The content of savelists can be exported to “the web”. This basically means that it is possible to include the records in the savelist in a WebOpac search tree. The option only applies to savelists that contain bibliographic records. It can be activated from within “Savelist management” or, in a more sophisticated way, from within “Selection management”.
When started from within “Savelist management”, the system basically asks two questions:
1. Should the content of the savelist be exported to the web?
2. And, if so, should “existing content” be removed from the (WebOpac) savelist?
If the first question is confirmed, the system will perform the following actions:
· The system will create a WebOpac savelist that contains all the records that are stored in the SSP savelist.
· The WebOpac savelist has the same name as the SSP savelist.
· If there is already a WebOpac savelist with the same name then the content of that savelist will be removed if the answer to the “remove existing content” question is answered positively. (Note that this has no effect on the content of the SSP savelist.)
· After all this has been done, the only thing that has happened is that a WebOpac savelist has been created. To include this savelist in a WebOpac search tree, the WebOpac Preferences tool should be used to include the savelist in a search tree. After this has been done the records will be accessible as a specific choice (hyperlink) in the WebOpac.
Savelists to the web can be deleted as follows. You use to switch to the savelists of the “fictitious” user “WebOpac savelists”. The system will display the savelists that have been published to the Web. On the overview screen of these savelists, you only have the option to delete the savelists.
141.2.19 Global delete
The function enables deletion of records starting from a savelist. Note that this option does not delete record IDs from the savelist, but actually deletes the records from the database. The option is available for borrowers, bibliographic records and items.
If you activate this option, the following workflow is started:
1. The system will ask for confirmation and indicate how many records will be removed from the system.
2. The system will ask in which mode the process should be started (online, batch or memory). For this function, the online mode is recommended.
3. The system will remove the records from the database. When attempting to delete a record, the system will apply the same rules as when a record is deleted from within the online application (AFO 431 for borrowers, AFO 111 for bibliographic records and AFO 111, AFO 121 or AFO 467 for items).
4. After the process has finished, the system shows how many records were deleted and in how many cases it was not able to delete the record. Records that could not be removed from the database are stored in a savelist that has the same name as the originally selected savelist, followed by a sequence number (e.g. if you delete the records in the savelist XXX, the system will store the record IDs of all records that could not be removed in the savelist XXX1). The records that cannot be deleted are not removed from the original savelist.
This option is only available for borrower records, bibliographic records and items records. The workflow is described in more detail below for “Global delete of items” and “Global delete of bibliographic records”. “Global delete of borrowers” follows the same workflow.
Note
Users must have Sys! rights for AFO 141 in order to be able to delete records. If you don't have them, you will be able to see the records in a savelist but unable to delete the contents of the savelist from teh database.
Global delete of items
The system offers the option to globally delete items; items that are stored in a savelist can be deleted as a group.
|
|
Global delete of items is available as an option on the Detail screen of Item type savelists. (Note that this button is only available for Borrower, Bibliographic and Item type savelists.) |
If activated, the system displays a warning and asks for a confirmation.

If confirmed, the system displays the standard window for starting processes. Although available in offline and memory mode, we advise running the process in online mode, as it offers superior monitoring facilities.
The system tries to delete all items in the savelist. The tests that apply when deleting individual items also apply for global delete.
Items that cannot be deleted will be stored in a separate savelist. The name of the savelist is shown on the screen:

Bibliographic records without holdings
Bibliographic records will not be deleted automatically if they no longer have any items attached to them as a consequence of a global delete of items. They will, however, be stored in the standard savelist for bibliographic records with no holdings information (i.e. the savelist AFVGPK for the fictitious user AAA).
Global delete of bibliographic records
The system offers the option to globally delete bibliographic records: bibliographic records that are stored in a savelist can be deleted as a group.
Global delete of bibliographic records is available as an option on the Detail screen of Bibliographic record type savelists. (Note that this button is only available for Bibliographic record, Borrower and Item type savelists.) This option is only available for users with system privileges.

If activated, the system displays a warning and asks for confirmation.
If confirmed, the system displays the standard window for starting processes. Although available in offline and memory mode, we advise running the process in online mode, as it offers superior monitoring facilities.
The system tries to delete all bibliographic records in the savelist. The tests that apply when deleting individual bibliographic records in AFO 111 also apply for global delete.
Bibliographic records that cannot be deleted will be stored in a separate savelist. The name of the savelist will be shown on the screen when the global delete process has finished. The records stored in that savelist will mention the reason why they could not be deleted on the Detail screen of that savelist.
141.2.20 Message to borrowers
The feature can be used to send an SMS text message to borrowers that are stored in a savelist. The system will allow the entry of a message. Note that the maximum length of an SMS text message is 160 characters. Longer messages will not be accepted.
SMS text messages are only sent to borrowers for whom a mobile phone number is stored in the borrower record. If there are multiple mobile numbers stored in a borrower record, the system will automatically select the first one found (starting from Address 1).However, if an address field is defined with an active date range (where the “Use from” and “Use until” dates are specified and today falls within this date range), the mobile phone number from this field (if defined) will be used rather than searching other address fields for a mobile phone number.
The actual SMS text messages are sent to the mobile phones by a service provider and not by the V-smart Smart system. V-smart Smart communicates with this service provider. Note that for large savelists, the communication process can take some time.
After the communication process has ended, the system will automatically generate three savelists that have the following names (we use examples that assume that we send an SMS text message to borrowers that are stored in the savelist XXX):
|
Name = savelist ID + |
Used if |
Example |
|
_SMS_OK |
A message was sent successfully to the borrower's mobile phone number |
XXX_SMS_OK |
|
_SMS_NotOK |
The borrower has a mobile phone number in his borrower record, but a message could not be sent successfully |
XXX_SMS_NotOK |
|
_SMS_NoPhone |
The borrower does not have a mobile phone number in his borrower record |
XXX_SMS_NoPhone |
Important remark
To be able to use this function, the necessary parameters have to be set up and the necessary license agreements have to be arranged with Infor and an SMS text messaging provider.
141.2.21 Select from a savelist
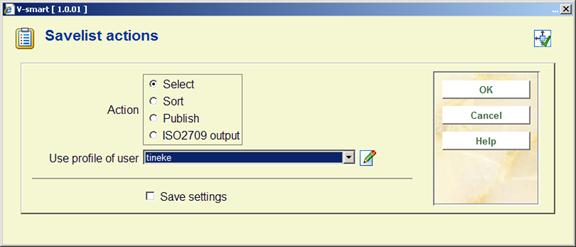
Savelists can be used as the starting point of an SSP selection process. If the option is activated, the system offers the choice between Select, Sort and Publish, and asks which user's profile should be used. Choose Select and a user. The system will then show the list of available selection profiles of that user and the list of associated profiles (i.e. the profiles that were recently used with this savelist). After a profile has been chosen, the system activates the form to start a selection process.
Further details can be found in the chapter on Selections.
See below for more information on using profiles of other users.
141.2.22 Sort the records in a savelist
Savelists can be used as the starting point of an SSP sorting process. If the option is activated, the system offers the choice between Select, Sort and Publish, and asks which user's profile should be used. Choose Sort and a user. The system will then show the list of available sorting profiles of that user and the list of associated profiles (i.e. the profiles that were recently used with this savelist). After a profile has been chosen, the system activates the form to start a sorting process.
Further details can be found in the chapter on Sorting.
See below for more information on using profiles of other users.
141.2.23 Publish savelists
Savelists can be used as the starting point of an SSP publishing process. If the option is activated, the system offers the choice between Select, Sort and Publish, and asks which user's profile should be used. Choose Publish and a user. The system will then show the list of available publishing profiles of that user and the list of associated profiles (i.e. the profiles that were recently used with this savelist). After a profile has been chosen, the system activates the form to start a publishing process.
Further details can be found in the chapter on Publishing.
See below for more information on using profiles of other users.
For bibliographic and authority savelists, the system automatically adds the option to the list of available actions (i.e. Select, Sort, Publish and ISO2709). If this option is chosen, the system will enable the selection of an output file. The records in the savelist will be exported to the savelist in ISO2709 format.
141.2.24 Using profiles of other users
When executing an action (select, sort or publish) from within savelist management, the system also allows users with system facilities to use profiles of other users. Note that this option implies the following:
· Users with system facilities can use any of the other users' profiles
· Users without system facilities can use their own profiles and the profiles that have been designated for “general use”

141.2.25 Quick view
Quick View allows you to view only the first 60 records in a savelist and will as such lead to a faster response from the system. (The feature is useful if you e.g. just want to have a quick look at a savelist to get a rough idea of its content.)
A Quick View display looks as follows:

The system shows how many records are displayed at the top of the screen. You can change to the Full View by clicking on the button. This is a toggle mode button that allows you to switch between full and quick views.
Note that all actions that you execute on the savelist will process the complete content of the savelist, and not just the records in the Quick View display.
141.2.26 “Associated savelists”
“Associated savelists” tracks historical savelists previously used as part of a selection, sorting or statistics execution and can be used for refreshing regular reports data. This allows the savelist names / data sources for various reporting capabilities to be remembered and the ability to define recurring reporting.
The functionality of “associated savelists” is similar to that of the Windows “My Recent Documents” functionality; it offers you the ability to access recently used savelists for specific profiles.
A selection profile may be set up to use one of three sources to create a new savelist:
· Basic file – execute against the entire database
· Savelist – execute against a specified savelist
· Associated savelist – execute against a savelist which has been previously used for this profile (this applies to sorting or statistics profiles)
If desired, a publishing profile can be associated with the selection and scheduled for execution by the Night Watchman at regular intervals.
Example
The initial selection created a savelist for all borrowers with blocked memberships.
The second selection uses this list of blocked borrowers to extract those with a particular home location. These can then be sent off to a publishing profile for form letters or labels. The selection and the publishing profiles can be scheduled for execution on a regular basis by the night watchman.
We are creating a selection using the selection profile “MEMBERSHIPCARDBLOCK”. The results of this selection are stored in the savelist “MembershipsBlocked” and are published with the publishing profile “LABELS”. This is defined as follows:
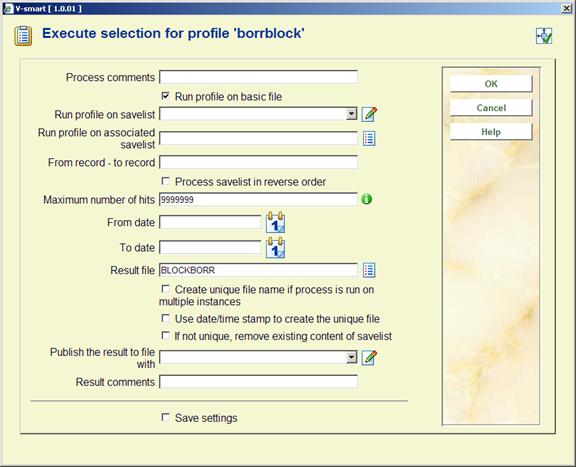
Subsequent execution of this selection profile will now have this savelist listed as an associated savelist for any further selections required or for the direct publishing of regularly generated reports.

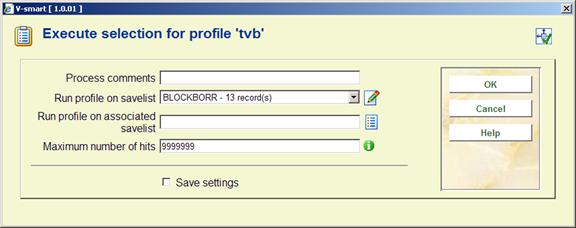
When executing the publishing Profiles, the Associated Savelist field will display only those savelist(s) which have been previously used with this publishing profile.
The savelist selection may be either an existing savelist available in the drop down list for “Run profile on savelist” OR historical savelists which have previously utilized this publishing profile. They are available in the drop down list for “Run profile on associated savelist”.
Removing associated savelists
If you want to remove one or more savelists from the list of associated savelists, you can do this on a number of screens; the overview screens of selection, sorting, publishing and statistical snapshot profiles. The button leads to a screen that displays all associated savelists for a selected profile. You can either delete all associated savelists or one or more specified savelists. Note however that the savelists are only removed from the list of associated savelists; the savelists themselves are not physically removed.
141.2.27 “Load records into database”
With this option you can load records from a savelist into a database on your system, based on an import profile as defined in AFO 133 (and comparable to the Copy function of AFO 111).
After selecting this option an input form will be displayed:

Select a Database and an Input profile and click . Now all records are copied from the savelist to the selected target database.
If a record has been successfully copied, it is removed from both the savelist and the source database. If some error occurs during the copy process, the record is not removed from the savelist.
Note
- no relations are copied
- all savelist records must have the same source database as the first savelist record – records with a different source database are not copied
141.3 Select
141.3.1 The selection process
SSP selection concepts
The SSP selection process uses the concept of selection profiles; selection criteria are grouped into a profile. This profile is then used to select data from the database (either from a “basic file” (e.g. the borrower file) or from a savelist). The result of such a selection process is always stored in a savelist. Selections can be run once or on multiple occasions, can be started immediately, or can be scheduled to be run at regular intervals.
This short description describes the two basic concepts of an SSP selection:
1. Selection profiles
2. Running and scheduling selections
Each of these concepts is described in detail in this chapter.
Selection profiles
SSP selections are based on the “profiles” concept, which implies the following. Selection criteria are grouped into profiles, which can be used again and again (“define once, use many times”). A selection profile can be very simple or very complicated and can be private or shared.
Running and scheduling selections
Selections can be run on either a basic file (e.g. a bibliographic database) or on a savelist. In all cases, the results are stored in a savelist. The file on which a selection runs is not a property of the selection profile, but a property of a specific selection process.
Selections can be run online, as batch or in memory mode. Memory mode enables scheduling of SSP selections at regular intervals, using the standard process start mechanisms.
141.3.2 The structure of selection profiles
The basic elements of a selection profiles are one or more selection criteria. Each selection profile has the following properties:
|
General properties · Name · User ID · Application · Comments · Number of criteria · Boolean relation between criteria · Date and time of creation |
|||||
|
One or more selection criteria |
|||||
|
Data element |
Operator |
Data type |
Variable |
Value |
Exact value |
|
|
|
|
|
|
|
An example to illustrate this:
User Raymond (User ID) has a profile TOROVANC (Name) to select borrowers (Application). He uses this profile to select all borrowers living in Toronto or Vancouver (to illustrate this he has added the comment “Toronto or Vancouver”). The profile has two criteria (Number of Criteria) which have an OR relation (Boolean relation between criteria). He has created the profile on March 15, 2004 (Date and time of creation).
The profile has two selection criteria:
· Borrower Addres1Place = Toronto
· Borrower Addres1Place = Vancouver
In these criteria the Data element is “Borrower Addres1Place”, the operator is “=” (equal to) and the Value is “Toronto” in criterion 1 and “Vancouver” in criterion 2.
The next screen shot shows an example of one selection criterion:

This selection criterion basically says “select all borrowers whose name contains the string “Castle”.
Multiple criteria can be combined into one profile, as shown in the next sample screen shot (the selection profile basically says “select all borrowers whose name contains the string “Castle” AND who were born after January 1, 1980).

All this is explained in much more detail in the following sections.
Remarks concerning bibliographic and authority data
For bibliographic and authority data the system supports selections on both “raw” and “logical” data. Raw data is the data as stored in the database and refers to actual fields and subfields (e.g. 200/$a or 245/$b). Logical data is formatted data that indirectly refers to the actual fields and subfields (e.g. “Title” or “Author”) and can be a concatenation of multiple raw data elements. Both types are available for selections (and also for sorting and publishing).
See the section on Representing, linking and storing data in the chapter on cataloguing in this document for more information on raw versus logical data elements.
The following screen example shows an overview of how these logical elements are displayed at the beginning of the selection criteria dropdown list:

Note that selections using logical data typically will run more slowly than those using raw data. Therefore, it is advisable to avoid the usage of logical data as much as possible.
141.3.3 Selection profile properties
Selection profiles have the following properties:
Name: The unique name (ID) of the selection profile. It has to be unique within the application.
User ID: The user that created the selection profile. Note that the system also provides a “fictitious” user “General use”, which is accessible by all users (i.e. the savelists are shared by all users). Furthermore, the system also provides a fictitious user “Examples”, which can be used as a source of example profiles.
Application: Each selection profile belongs to an application. See the section on savelists for an overview of valid applications.
Comments: A free text comment string.
Number of criteria: The number of selection criteria that are in the selection profile.
Selection criteria 1 to n: The identification of the selection criteria.
Boolean relation: The Boolean relation between the defined selection criteria (e.g. if three criteria are defined, the Boolean relation is e.g. “1 AND 2 AND 3” or “(1 OR 2) and 3”.
141.3.4 Selection criteria properties
Each selection criterion has the following properties:
Data element: The data element that the system will use for selection (e.g. title for a bibliographic savelist, name for a borrower savelist, etc.).
You can use the button on the form to view the primary characteristics of the Data element. For data elements that are followed by the text “(See list for possible values)”, you can use the button on the form to view a list of valid values. The system will show a list of valid values and you can select one from the list. The selected value will be inserted into the field “Value”.
Operator: The system supports the following operators:
|
1 |
Equal to |
|
2 |
Greater than |
|
3 |
Less than |
|
4 |
Contains |
|
5 |
Follows |
|
6 |
Defined |
|
7 |
Matches format |
|
8 |
Matches pattern |
|
9 |
Not equal to |
|
10 |
Less than or equal to |
|
11 |
Greater than or equal to |
|
12 |
Does not contain |
|
13 |
Does not follow |
|
14 |
Not defined |
|
15 |
Does not match format |
|
16 |
Does not match pattern |
The operators are discussed in detail in the next section.
Data type: The data type is either “string” or “variable”. String is to be used if the Value (see next property) is to be interpreted as a literal string, while Variable should be used for Values that are to be “interpreted” as a variable (e.g. “1st of the current month” is not a string, but implies that the system has to use the 1st day of the current month as value).
Variable: If the data type is “variable”, one can choose from the following variables:
|
Selection Variables |
|
Today |
|
First day of current month |
|
Last day of current month |
|
1 January current year |
|
31 December current year |
|
First day of last month |
|
Last day of last month |
|
1 January last year |
|
31 December last year |
|
Current time |
|
Yesterday |
The Variables can be used in profiles that are scheduled to run at regular intervals, which make them dynamic (e.g. a profile that is run on the 1st of every month, can thus automatically select data that was created between the 1st and last day of the previous month). This enables the dynamic usage of one common profile resulting in different search results.
Value: If the data type is “string” a literal string can be entered in this field.
Exact value: This value is a Yes/No flag that indicates whether or not the value of Value is to be interpreted as an “exact” value (e.g. a selection like “all words that contain the word ‘towers' will select only those titles that contain the exact word ‘towers' if the Exact value property is set to Yes. If it is set to No however, the system will also select ‘Towers', ‘TOWERS', ‘Towèrs', etc.).
Occurrence: The “Occurrence” property can be attached to any selection action, but is only relevant for retrieval of repeatable data elements. The property allows you to define specific occurrences of a data element in a record. For example, if you select from the bibliographic database the records that contain the author “Tiffany Gianetto”, the result will be that you will get all records that contain this author independent of his relative position in the list of authors. However, if you add to the same selection the Occurrence “1”, you will receive only the records in which “Tiffany Gianetto” is the first author.
141.3.5 Operators
The system supports eight operators, all of which have a positive and a negative variant, so there are in fact sixteen.
|
Positive variant |
Negative variant |
|
Equal to |
Not equal to |
|
Greater than |
Less than or equal to |
|
Less than |
Greater than or equal to |
|
Defined |
Not defined |
|
Contains |
Does not contain |
|
Follows |
Does not follow |
|
Matches format |
Does not match format |
|
Matches pattern |
Does not match pattern |
The operator returns a positive search result if complete identity is found between the data in the selection profile and the data in the file. Note that the comparison is done on a character per character basis which implies that differences in punctuation and lowercase/uppercase can be important.
The “Exact value” property of a selection criterion determines how the exact data comparison is done. If “Exact value” is set to Yes, the data will be compared without any manipulation. However if the “Exact value” property of the criterion is set to No, the system will automatically transform the data in the file and the data in the selection criterion to uppercase before it compares them.
For the data types “Date” and “Time”, the data is not evaluated as a string, but as an internal date or time value. This implies that for these data types for comparisons “02/10/1990” and “2/10/1990” are identical.
For the data types “DataAsString” and “TimeAsString” however, the comparison is done on a per string basis. This implies that for these data types for comparisons “02/10/1990” and “2/10/1990” are not identical. As a consequence the following two selections do not necessarily return the same results:
· Date = 02/10/1990
· Date > 01/10/1990 AND date < 03/10/1990
The first selection is evaluated as a string comparison which is not the case for the second selection. [See also the sections on the and operators.]
The operator returns a positive search result if the data in the file is greater than the value in the selection profile. The operator is, in principle, only useful for fields that have either a ‘Numeric', ‘Date' or ‘DateAsString' data type.
If the operator is used, data is evaluated as a numeric value. If this operator is used for fields with a non-numeric content, the system will automatically transform the data to a numeric value.
Some examples:
|
Data |
Numeric value |
Comments |
|
55a |
55 |
Trailing non-numeric characters are removed |
|
A |
0 |
The data starts with a non-numeric value |
|
01 |
1 |
Leading zeros are removed |
|
Fish |
0 |
The data starts with a non-numeric value |
|
A55 |
0 |
The data starts with a non-numeric value |
The operator returns a positive search result if the data in the file is less than the value in the selection profile. The operator is, in principle, only useful for fields that have either a ‘Numeric', ‘Date' or ‘DateAsString' data type.
If the operator is used, data is evaluated as a numeric value. If this operator is used for fields with a non-numeric content, the system will automatically transform the data to a numeric value. See the examples in the section on the operator.
The operator returns a positive search result if the data element that is defined as a selection criterion exists in the file. This implies that the field (or subfield) exists and is not empty.
The operator returns a positive search result if the data element that is defined as a selection criterion does not exist in the file. This implies that the field (or subfield) does not exist or that the field (or subfield) does exist but is empty.
The operator returns a positive search result if the data element that is defined as a selection criterion is part of the data in the file. Note that the comparison is done on a character per character basis, which implies that differences in punctuation and lowercase/uppercase can be important.
The “Exact value” property of a selection criterion determines how the exact data comparison is done. If “Exact value” is set to Yes, the data will be compared without any manipulation. However, if the “Exact value” property of the criterion is set to No, the system will automatically transform the data in the file and the data in the selection criterion to uppercase before it compares them.
For the data types “Date” and “Time”, the data is not evaluated as a string, but as an internal date or time value. This implies that for these data types the operator can return completely unexpected search results. It is therefore not advisable to use the operator for data elements of these types.
For the data types “DataAsString” and “TimeAsString” however, the comparison is done on a per string basis. This implies that for these data types for comparisons “02/10/1990” and “2/10/1990” are not identical. As a consequence the following two selections do not return the same results:
· Date contains 12/01/2003
· Date contains 12/1/2003
The missing 0 (zero) in the second example (“01” versus “1”) is relevant for these data types.
The operator returns a positive search result if the data element in the file alphabetically follows the data value in the selection criteria. It is important to realize that the system sorts strings alphabetically on a character per character basis, that digits precede strings and that uppercase characters precede lowercase characters.
The system sorts strings as follows:
1
5
55
550
5000
01
010
02
A
ABC
Abc
B
C
FISH
Fish
Fishes
b
Note that 01, 010 and 02 are treated as strings because of the leading 0 (zero).
The operator returns a positive search result if the data in the file corresponds to a format as defined in the selection criterion. A format is, in this context, built from two elements; character strings and a truncation character. The at-sign (@) is used as the truncation character. This character can be used to indicate left, middle and right truncation.
Typical examples of such formats are shown in the following table.
|
Format |
Means |
Examples |
|
A@ |
Starts with an A |
Antwerp Amsterdam Ann A |
|
@A |
Ends with an A |
SABENA S.A.B.E.N.A A |
|
A@DIN |
Begins with an A, ends with DIN |
ALADIN ALLADIN ALLADDIN ADIN A.DIN |
|
A@D@IN |
Begins with an A, followed by a whatever character string, followed by a D, followed by a whatever character string, ends with IN |
ALADIN ALLADIN ALLADDIN ADIN A.D.IN A.DIN |
|
THE @ Wind |
Begins with THE and a blank, followed by a whatever character string, ends with Wind |
THE Wild Wind THE – Wind |
|
@-BE |
Ends with -BE |
4900-BE A-BE --BE -BE |
The “Exact value” property of a selection criterion determines how the exact data comparison is done. If “Exact value” is set to Yes, the data will be compared without any manipulation. However if the “Exact value” property of the criterion is set to No, the system will automatically transform the data in the file and the data in the selection criterion to uppercase before it compares them.
The operator returns a positive search result if the data in the file corresponds to a pattern as defined in the selection criterion. A pattern is, in this context, built from [a] specific data types and [b] specific character strings of [c] a specific length and [d] in a specific sequence.
The four elements (data types, character strings, length and sequence) are described in detail in this section.
Patterns are sequences of characters that enable you to make quite specific selections, in which you can test for the exact length of data, for the presence of specific characters or character strings or for specific positions, as well as for the presence of specific types of characters.
Data type: The system distinguishes between the following data types.
|
Code |
Data type |
Example characters |
|
A |
Alphabetic characters (the alphabet) |
ABCDEF .... XYZ abcdef .... xyz |
|
L |
Lowercase characters |
abc .... xyz |
|
U |
Uppercase characters |
ABC .... XYZ |
|
N |
Numeric characters |
0 1 2 3 4 5 6 7 8 9 |
|
P |
Punctuation marks |
. / ; ; - ( ) < > .... |
|
C |
Control characters |
é è ë ê á à ä â û <Tab> <Esc>.... |
|
E |
Everything |
all characters |
Note that diacritics fall under control characters in this classification.
The data types can be combined, implying a Boolean OR relation. The sequence of the types within the combination does not play a role.
Examples of Data types
|
Example combinations |
Explanation |
Examples |
|
AN or NA |
Alphanumeric |
12 12A A12 After |
|
ANP or APN or PAN or PNA or NPA or NAP |
Alphanumeric or punctuation |
12 12. .12 .12a 12.a.b.1 . |
|
LP or PL |
Lowercase or punctuation characters |
xxx . xxx. .x.x.y. |
Specifying data length: The length of character strings can be specified using one of the following methods.
|
Method |
Significance |
Examples |
Example comments |
|
Number |
Precise number |
5 |
Five characters long |
|
.Number |
Precise number or less |
.5 |
5 characters or less long (i.e. 0, 1, 2, 3, 4 or 5) |
|
Number. |
Precise number or more |
5. |
5 or more characters long |
|
. |
Any number |
. |
Any number of characters (0 or more) |
|
Number1.Number2 |
Precise number 1 or more, but the number does not exceed 2 |
3.5 |
Three characters or more long, but no more than 5 characters (i.e. 3, 4 or 5) |
Specific character strings: The system also enables you to specify precise character strings. These character strings are enclosed in double quotes (in contrast to data type and data length).
|
Examples |
Meaning |
|
“fish” |
the string ‘fish' |
|
“5” |
the string ‘5' |
|
“5 fish” |
the string ‘5 fish' |
Since you can combine data types and data strings with lengths infinitely, you can define very specific patterns. It is mandatory that each character type and each character string is preceded by a length specification.
Examples
A number of concrete examples will clarify this rather abstract explanation and should illustrate the power of the operator.
|
Pattern |
Significance |
Examples |
|
2N |
Two digits |
55 |
|
4N |
Four digits |
2300 |
|
4N1P2A |
Four digits, one punctuation character, two alpha characters |
5603 AG |
|
4N1” “2U |
Four digits, 1 space (string) two uppercase letters |
5603 AC |
|
1”0”2N1”/”6N |
One zero with (string), two digits, one slash (string), six digits |
014/419494 |
|
1.2N |
One or two digits |
5 |
|
1U.AN |
One uppercase letter followed by any number of alphanumeric characters |
T |
|
1U.ANP |
One uppercase letter followed by any number of alphanumeric characters or punctuation characters |
T |
|
1. A |
One or more alphabetic characters |
Avis |
|
1. “A” |
One or more ‘A's (string) |
A |
|
.1A |
One or less alphabetic characters |
A |
|
1.3”fish” |
One, two or three occurrences of the string “fish” |
Fish |
|
1U.AN1”-”1.AN |
One uppercase letter, any number of alphanumeric characters, one hyphen (string), one or more alphanumeric characters |
Eindhoven-A |
|
1P.E |
One punctuation character followed by anything |
.55 |
|
1U1C1U |
One uppercase, one control character, one uppercase |
AáC |
|
1“water”1.L |
One occurrence of the string ‘water' followed by one or more lowercase letters |
Watermark |
|
5A1” ”1.ANP |
Five alphabetic characters followed by a space and one or more alphanumeric characters or punctuation marks |
Vubis is five letters long |
|
.E1”drop” |
Anything followed by the string “drop” |
Drop |
141.3.6 Examples of selection profiles and selection criteria
This section contains a number of screen shots of selection profile examples.
Example 1: – Books created in a specific year with a specific material type
The selection in the bibliographic description file(s) contains two criteria:
· Creation date not earlier than the 1st of January of the current year
· The field 200$b (material type) should be equal to 2 (a specific material type)

Example 2: – All new articles today
The selection in the bibliographic description file(s) contains two criteria:
· The fourth fixed field of the Unimarc record leader (bibliographic level – code) should contain ”a”
· Creation date is “today”

Example 3: – All items that have an outstanding 3rd claim in a certain year
The selection in the item file(s) contains one criterion; the date on which the third claim for the items was sent in the current year (date equal to or later than the 1st January of the current year).

Example 4: – Active borrowers in a specific year
The selection in the borrower file(s) contains two criteria:
· The borrower has a valid membership fee (membership fee expiry date not earlier than today)
· The borrower has lent at least one item in the current year (number of loans in 2004 greater than 0)
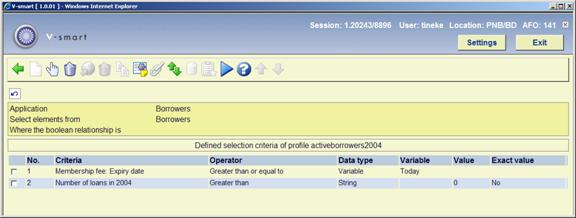
Note that the definition of an “active” borrower may vary from site to site.
Example 5: – Active borrowers of a certain category and a certain age that have lent items at a certain location
The selection in the borrower file(s) contains four criteria:
· The current number of loans is greater than 0
· The postcode starts with “11” (is of format “11@”)
· The date of birth of the borrower is later than the 31st December 1995
· The location of loan is equal to location “BD”
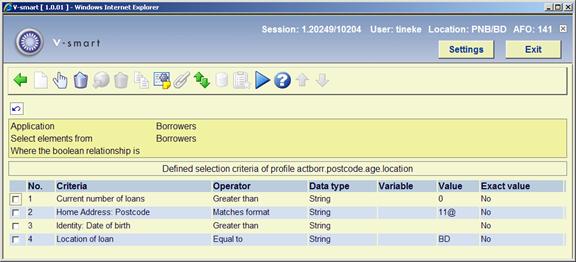
Example 6: – Borrowers that have an item lent with a due date of today
The selection in the borrower file(s) contains one criterion; the loan due date is identical to today.
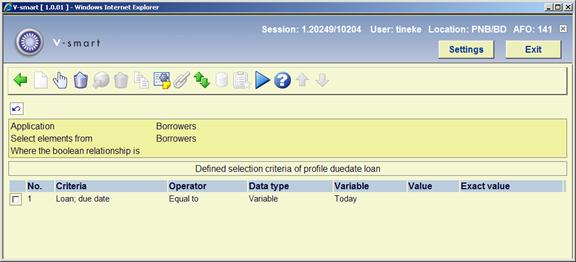
Example 7: – Postcode
The selection in the borrower file(s) contains one criterion; the postcode starts with 11 (of format “11@”).

Example 8: – Items of a specific item category borrowed by women between 30 and 40
The selection in the bibliographic file(s) contains four criteria:
· The material type is equal to “BO”
· The gender of the borrower contains “2” (female)
· The date of birth of the borrower is later than “31/12/1963”
· The date of birth of the borrower is earlier than “01/01/1974”
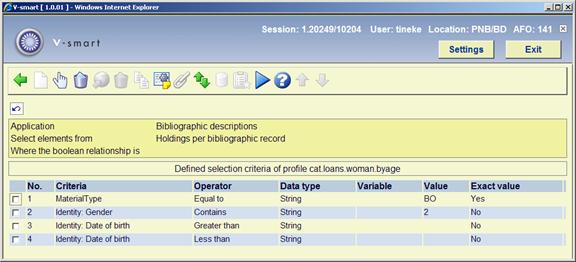
141.3.7 Managing selection profiles
Options available to manage selection profiles
When managing selection profiles, the following actions and tools are available.
|
Option (button) |
Use this option to: |
|
Creating a new selection profile |
Create a new selection profile |
|
Changing / update selection profiles |
Delete or add criteria to a profile |
|
Deleting selection profiles |
Delete a selection profile |
|
Copy selection profiles |
Copy selection profiles between users and/or between applications |
|
Change the properties of selection profiles |
Change the name and / or comments of the profile |
|
Lock / unlock a profile |
Lock or unlock a profile |
|
View the selection profiles of another user |
Navigate to the selection profiles of another user; if you are allowed to use this option, you can then use those profiles as if they were your own |
|
Navigate to the most recently created savelist |
View the content of the most recently savelist; this function is particularly useful after you have ran a selection profile and you want to look at the result of the query |
|
Run a selection profile |
Execute a query |
|
Set-up the parameters for an “export to the web” |
Set-up parameters that will make sure that the results of the selected profile (i.e. the content of a savelist) are automatically exported to the web |
|
View associated savelists |
View or remove the associated savelists (this option is described in the chapter on savelists) |
We will describe a number of these actions in more detail in the following sections.
Workflow and organization of selection profiles
Selection profiles management is organized on two main screens:
· The main (top level) screen displays a list of selection profiles and their most important properties (such as name, number of criteria, application, comments and others).
· The detail (second level) screen displays the selection criteria that are linked to the profile and the Boolean relation between those criteria.
Most options are available on both screens, but not all. The following tables show an overview of which options are available on which screen.
Options available on the main screen
|
Shortcut |
Option |
|
* |
Changing / update selection profiles |
|
AS* |
Associated savelists |
|
B |
Previous |
|
C* |
Copy selection profiles |
|
F |
Next |
|
G |
Navigate to the most recently created savelist |
|
L* |
Lock / unlock |
|
PW |
View the selection profiles of another user |
|
S* |
Deleting selection profiles |
|
T* |
Change the properties of selection profiles |
|
UL* |
Unlock a profile |
|
W* |
Set-up the parameters for an “export to the web” |
|
X* |
Run a selection profile |
Shortcuts that end with an asterisk (*) require the selection of a profile.
Options available on the detail screen
|
Shortcut |
Option |
|
* |
Change criteria |
|
B |
Previous |
|
BOOL |
Add, delete or change Boolean relation between criteria |
|
C |
Copy profile |
|
E |
Change file to select from |
|
F |
Next |
|
I |
New criterion |
|
G |
Navigate to the most recently created savelist |
|
S |
Delete profile |
|
S* |
Delete selection criterion |
|
T |
View / change profile comments |
|
V* |
Move criterion |
|
W |
Set-up the parameters for an “export to the web” |
|
X |
Run selection profile |
Shortcuts that end with an asterisk (*) require the selection of a criterion.
141.3.8 Creating a new selection profile
Creating a new selection profile is a two step process, in which the second step is repeatable.
Step 1: – Define the general properties of the selection profile.

After you have submitted the form, the system will automatically switch to the overview screen of selection criteria. You can now add one or more selection criteria.
Step 2 – Define one or more selection criteria.
See the screen shot at the beginning of the section on selection profiles.
Note that additional actions are possible (e.g. defining the Boolean relation between criteria; by default this is an AND relation). These are described in the upcoming sections.
The fields Update type (this is a dropdown list that contains update type for Z39.50 record update) and Update profile (this is a dropdown list of valid Z39.50 cataloging update profiles) are only applicable to bibliographic selections. See the general help on data harvesting for more information.
141.3.9 Copy a selection profile
The Copy Selection Profile feature can be used to copy profiles:
· To another name
· and/or
· To another user
Copying to another name will just create a duplicate profile. Copying to another user will create the profile for another user.
141.3.10 Lock / unlock a selection profile
Selection profiles can be locked by any user. This will imply that the selection profile cannot be modified anymore, not even by the person who locked it. The exceptions to this rule are the users with system privileges who can unlock selection profiles of any user.
This option is provided to lock profiles, so that one can be absolutely sure that their content and properties will not change.
Note that locked profiles can be copied.
141.3.11 View the selection profiles of another user
To view the selection profiles of another user, the system allows access to selection profiles created by another user. Users with system privileges can access all other users' selection profiles. Other users can only access the selection profiles stored under the fictitious user “General use” and under the fictitious user “Examples”. The selection profiles stored as examples can be copied to your own selection profiles; you will then be able to modify the selection profile if necessary.
141.3.12 Delete a selection profile
When deleting a selection profile, the system will ask for confirmation. If confirmed, the selection profile will be removed from the system.
Note that the savelists created with the selection profile will remain untouched.
141.3.13 Navigate to the most recently created savelist[//]
You can navigate to the most recently created savelist. The system will show the record overview screen of the savelist.
Please note the following: If the last executed selection did not result in any records (i.e. an empty savelist), it will nonetheless be displayed (with a content of 0 records). Note that this only applies to savelists that have been created with SSP select and sort actions.
141.3.14 Run a selection profile
If you “run” (execute) a selection profile, the system displays a form that allows you to define the process parameters. Each selection process that is started has a number of properties.

Process comments: This comment is added to the process. It is related to the process and not to the selection profile or the result savelist. In the current version, there are no functions to view the process comments at a later stage.
Start profile on basic file: Selections can run on either the “basic file” or on “savelists”. “Basic files” are the “mother” data files, such as the borrower file, the bibliographic database, the order file, etc. You must either set this property to Yes, or select a valid savelist (see the next property).
Start profile on savelist: Selections can run on either the “basic file” or on “savelists”. If you choose to run the selection on an existing profile, only records that are present in that savelist will be processed.
Note that this savelist cannot be identical to the result savelist. You must either select a valid savelist, or set the “Start profile on basic file” property to Yes (see the previous property).
Start profile on associated savelist: Selections can run on a specific type of savelists, called “Associated savelists”. These are savelists that were previously used with the current selection profile. “Associated savelists” provide a quick and easy access to the savelists that are likely to be the most relevant ones. See the section on “Associated savelists” in the chapter on Savelists.
From record - to record: You can specify the start and end record of the selection. Use the following syntax:
· You can define multiple individual start and end values, separated by “;” (semicolon).
· Start and end value must be separated by “-” (hyphen).
· The values may only contain digits, letters and the punctuation character “.” (dot).
· The end value must be greater than or equal to the start value.
Example: “40-60;100-105;2-3” means that only the ranges from 2 to 3, from 40 to 60 and from 100 to 105 will be evaluated by the selection process.
If any of the above characters are used as part of the barcode, order etc, then use quotation marks when in question. i.e. "07-0001"-"07-2000" for barcode ranges and for orders "200300044/0001"-"200300055/0001" etc.
Execute in reverse order: If this property is not set, the system will process the data in the file in the order in which the records are stored (normally this is in ascending order). However, you can specify that the process should be run in “reverse order”; this implies that the records that were most recently added to the file that is being processed will be selected first.
Maximum number of hits: The selection process will terminate as soon as the defined number of hits has been reached.
From date: This is only valid for date related files. Typically these are transaction files, such as Circulation Transactions and Movement of Items Transactions.
To date: This is only valid for date related files. Typically these are transaction files, such as Circulation Transactions and Movement of Items Transactions.
Result savelist: The result savelist is the savelist in which the valid records (i.e. the records that are evaluated positively by the selection process) will be stored. This can either be an existing or a new savelist. If you select an existing savelist, the system will ask for confirmation.
Create unique savelist: If you set this property to Yes, the system will automatically create a unique result savelist, even if you select an existing result savelist. The system does this by adding an increment to the result savelist name.
Example: If you select the existing result savelist XXX and set the “Create unique savelist” value to Yes, the system will create the savelist XXX1.
Note in addition that, if there is already a digit or digits present in the name, the system increments the last digit of the result savelist, so using the existing savelist “2004” will result in the new savelist “2005”. In this case the system does not add an additional digit, but increments the already present last digit.
Use date/time stamp to create unique savelist: If the date/time stamp option is set to Yes, a date/time stamp is created to make the file unique (instead of the standard practice for making files unique, which adds a number to the file name). See below for more information on the relation of this parameter to the “Publish result to file with” property and the mechanism for automatically publishing the result of a selection.
Remove existing content of result savelist: If you set this property to Yes, the system will remove any existing content in the specified result savelist.
Publish result to file with: The “Publish the result to file with” gives you the ability to select a publishing profile. The selected profile will be used to generate output; the result of the selection is published (exported to file) utilizing the selected publishing profile. See below for more information on the relation of this parameter to the “Use date/time stamp to create unique savelist” property and the mechanism for automatically publishing the result of a selection.
Result savelist comments: This comment will be added to the result savelist.
141.3.15 Automatically publish the result of a selection
It is possible to export the results of a selection automatically to a file. Two fields are available on the “Execute selection” form to achieve this:
· “Use date/time stamp to create the unique file”
· “Publish the result to file with”
If the date/time stamp option is set to Yes, a date/time stamp is created to make the file unique (instead of the standard practice for making files unique, which adds a number to the file name). The date/time stamp has the format YYYYMMDDHHMM (e.g. “file200501170512.txt”).
The “Publish the result to file with” gives you the ability to select a publishing profile. The selected profile will be used to generate output; the result of the selection is published (exported to a file) with the selected publishing profile.
The default path for the destination of the files is c:\temp\. An alternative path can be set by Infor. The path must always end with a backslash.
To get the result file stored on the server machine, the process must be run in Memory. To get the result file stored on the client machine, the process must be run Online or as Batch.
141.3.16 Set-up parameters for an “export to the web”
The “Export to the Web” functionality allows you to attach to a selection profile a number of parameters that will allow the system to link the result savelist(s) into WebOpac search trees automatically. Note that this functionality is only available for savelists that contain bibliographic records.
· “Automatically include result savelist in WebOpac”
If this property is set to Yes, the system will automatically make the result savelist available as a WebOpac savelist.
· “Include in Tree/Page”
This property allows you to specify in which Page of which Tree you want to include the result savelist. The system shows all Pages of all WebOpac trees.
· “Wording [language]”
The wording of the savelist in the search tree in the various languages.
· “Dynamic content update”
If this property is set to Yes, the contents of the WebOpac savelist will be updated automatically if the contents of the SSP savelist change.
141.3.17 Change the properties of a selection profile
The system allows you to change to the general properties of a selection profile; the name of the profile and its comments. If you change the name, the system will ask for confirmation.
141.3.18 Add criteria to a selection profile / Change criteria in a selection profile
If you want to add criteria to a selection profile, the system will display the following form.
This form allows you to define the following properties:
Selection criterion: Select a criterion from the list.
Operator: Select an operator from the list of available operators.
Data type: Select “String” or “Variable”.
Variable: Select a variable from the list of available variables. See the section on Variables for an overview of available Variable parameters.
Value: Type in a value. This can be any string.
Exact value: Indicate whether or not the Value is to be interpreted “exactly” (i.e. without any transformation) or “normalized” (i.e. transformed to uppercase).
All these elements have been explained in detail in previous sections of this chapter. The following section describes:
The relationship between Variable and Value
If the Data Type “Variable” is selected, you can define both “Variable” and “Value” to achieve specific results. If the “Value” begins with a plus (+) or a minus (-) sign, followed by a number, the system will add (+) or deduct (-) the number from the value of the “Variable”.
Example: If you define Variable as “Today” and Value as “+1”, the system will select the date of “Today+1” which is tomorrow. If you define Variable as “1st January of Current Year” and Value as “-1”, the system will select the “first day of the current year -1” which is the last day of the previous year.
141.3.19 Boolean relations between criteria in a selection profile
If you do not add a Boolean relation to the profile, the system will automatically assume the Boolean relation to be “AND”. You can change the Boolean relation by using one of the following syntaxes.
|
Syntax |
Boolean relation |
|
AND |
Boolean AND |
|
OR |
Boolean OR |
|
NOT |
Boolean NOT |
|
Complex |
See following section |
“Complex” Boolean relations are expressed using the AND, NOT and OR operators and digits that refer to the criteria in the profile.
Note that the evaluation of the string is pure left to right evaluation and that brackets should be used for nesting. Blanks will be automatically removed from the Boolean expression. The Boolean operators are not case-sensitive.
Some examples:
|
Example |
Comments |
Identical to |
|
1 OR 2 |
Criterion 1 OR Criterion 2 |
OR 1OR2 (1OR2) (1 OR 2) 1or2 |
|
(1 OR 2) AND 3 |
(Criterion 1 OR Criterion 2) AND Criterion 3 |
((1 OR 2) AND 3) (1OR2)AND3 (1 or 2) and 3 1 OR 2 AND 3 [Because the evaluation is pure left to right, brackets can be omitted in this case.] |
|
(1 NOT 3) OR 2 |
(Criterion 1 NOT Criterion 3) OR Criterion 2 |
1 NOT 3 OR 2 [Because the evaluation is pure left to right, brackets can be omitted in this case.] |
|
(1 OR 2) NOT (3 AND 4) |
(Criterion 1 OR Criterion 2) NOT (Criterion 3 AND Criterion 4) |
|
Note that the Boolean expression cannot start with a Boolean operator. The following expressions are invalid:
NOT (1 AND 2)
NOT 3 OR 4
If you do not include all criteria in the Boolean expression, the ones that are not in the expression are automatically added to the expression with an AND relation.
Example: If a profile contains three selection criteria and a Boolean expression “2 or 3” the system will automatically add the first criterion to the expression, which results in “2 or 3 and 1”. However, we advise including all criteria in the Boolean expression to avoid confusion.
141.3.20 Delete selection criteria from a profile
You can delete criteria from a selection profile. The system will ask for confirmation.
Note that deleting a selection criterion can make the Boolean expression invalid. If this is the case, the system will display a warning and remove the Boolean expression. You will have to redefine a correct expression.
141.3.21 Move criteria in a selection profile
You can move criteria in a selection profile as follows:
1. Select the criteria you want to move to another place in the list.
2. Activate the “Move criteria” button.
3. Indicate to which place in the list the selected criteria should be moved. (Note that this results in a Move, not in a Replace.)
Note that changing the order of the selection criteria can change the evaluation of the Boolean expression. The system displays a warning, but does not change the Boolean expression following the Move action. If necessary, you should do this manually.
141.3.22 Change “file to select from”
If you want to add selection criteria to a profile that are “located” in other data files than the one you are currently selecting from, you can use the “Change File to Select From” option. The system will show you all the files you can link to. Select a file. If you then add a new criterion, you will notice that the system now displays the data elements from the chosen file.
See the section on Automatic links between files.
The files that are available are determined as follows:
1. The system maintains a system file that contains all the links that are theoretically possible (e.g. file A has a link to file B; file B has a link to file C etc.).
2. The system automatically creates “iterative” links to other files.
· Example: If you are selecting from file A, which has a link to file B, which in its turn has a link to file C, file C will also appear in the list of available link files.
See the section on Automatic file linking for an overview of the valid links between files.
141.4 Sort
141.4.1 The sorting process
SSP sorting concepts
The SSP sorting process uses the concept of sorting profiles; sorting criteria are grouped into a profile. This profile is then used to sort data that is stored in a savelist. The result of such a sorting process is stored in a separate savelist. Sorts can be run once or on multiple occasions, can be started immediately, or can be scheduled to run at regular intervals.
This short description describes the two basic concepts of SSP sorting:
· Sorting profiles
· and
· Running and scheduling sorts
Each of these concepts is described in detail in this chapter.
Sorting profiles
SSP sorts are based on the “profiles” concept, which implies the following. Sort criteria are grouped into profiles, which can be used again and again (“define once, use many times”). A sorting profile can be very simple or very complicated and can be private or shared.
Running and scheduling sorts
Sorts can only run on records that are stored in a savelist (i.e. they do not run on the “basic files”). The results are stored in a separate savelist. The savelist on which a sort process runs is not a property of the sorting profile, but a property of a specific sort action.
Sorts can be run online, as batch or in memory mode. The last option enables scheduling of SSP sorts at regular intervals, utilizing the facilities of the standard process start mechanisms.
Sort order principles
When sorting, the system will normalize data to uppercase. The system sorts data as follows:
1
5
55
550
5000
01
010
02
A
ABC
B
C
FISH
Note that 01, 010 and 02 are treated as strings because of the leading 0 (zero).
Note also that, when sorting on title (for bibliographic records), the system will take into account the Non-filing Mark as set in the bibliographic record.
141.4.2 The structure of sorting profiles
The basic elements of a sorting profile are one or more sort criteria. Each sorting profile has the following properties:
|
General properties · Name · User ID · Application · Comments · Number of criteria · Date and time of creation |
|||
|
One or more sort criteria |
|||
|
Data element |
Repeat value |
Grouping table |
Sort descending |
|
|
|
|
|
An example to illustrate this:
User Raymond (User id) has a profile SORT (Name) to sort borrowers (Application). He uses this profile to sort borrowers. The profile has two criteria (Number of Criteria). He created the profile on July 23, 2004 (Date and time of creation).
The profile has two sort criteria:
· Borrower Name
· Borrower Gender
The next screen shot shows an example of one sort criterion:

This sort criterion basically says “sort on Gender”.
Multiple criteria can be combined into one profile, as shown in the next sample screen shot (first sort on Name then on Gender).

All this is explained in much more detail in the following sections.
Remark regarding bibliographic and authority data
For bibliographic and authority data the system supports sorts on both “Raw” and “Logical” data. “Raw” data is the data as stored in the database and refers to actual fields and subfields (e.g. 200/$a or 245/$b). “Logical” data is formatted data that indirectly refers to the actual fields and subfields (e.g. “Title” or “Author”) and can be a concatenation of multiple raw data elements. Both types are available for sorting (and also for Sorting and Publishing).
See the section on “Representing, linking and storing data” in the chapter on cataloguing in this document for more information on “Raw” and “Logical” data elements.
Note that sorting using “Logical” data will usually run more slowly than sorting using “Raw” data. It is therefore advisable to avoid using “Logical” data if possible.
141.4.3 Sorting profile properties
Sorting profiles have the following properties:
Name: The unique name (ID) of the sorting profile. It has to be unique within the application.
User ID: The user who created the sorting profile.
Note that the system also provides a “fictitious” user “General use”, which is accessible by all users (i.e. the savelists are shared by all users). Furthermore, the system also provides a fictitious user “Examples”, from which example profiles can be copied by any user.
Application: Each sorting profile belongs to an application. See the section on savelists for an overview of valid applications.
Comments: A free text comment string.
Number of criteria: The number of sort criteria that are in the sorting profile.
Sort criteria 1 to n: The identification of the sort criteria.
141.4.4 Sort criteria properties
Each sort criterion has the following properties:
Data element: The data element that the system will use for sorting (e.g. title for a bibliographic savelist, name for a borrower savelist, etc.).
You can use the Details button on the form to view the primary characteristics of the Data element.
Repeat value: This property indicates, for repeating fields, how many instances of the field should appear in the sorted list (e.g. if there are five authors in a bibliographic record, should the system sort on all five, or e.g. only on the first one). This property is, therefore, only useful for repeating data elements, to indicate how many sort headers should be created for the field. By default the property is set to 1.
An example: If a bibliographic record has five authors (A, B, C, D and E) and the “Repeat value” is set to 1, the system will only sort on author A; if it is set to 3, the system will sort on A, B and C; if it is set to 999, it will sort on all authors (A to E).
Grouping table: Grouping tables can be used to “group” or to “rename” sort headers. Examples of these are:
· When sorting on Gender (Borrowers), use a sort table to sort on “Male”, “Female” or “Unknown” instead of the internal Gender codes 1, 2 or 0 (an example of “renaming” the sort headers).
· When sorting on Place (Borrowers), use a sort table to group postcodes into a limited number of groups (an example of grouping the sort headers).
· When sorting on Place (Borrowers), “London” is sorted as “London”, “Paris” as “Paris”, and all other places are grouped as “Others”; so only three sort criteria will appear in the resulting sorted list.
· When sorting on UDC (Bibliographic descriptions), use a sort table to group on UDC Main groups (an example of grouping individual UDC codes into subject groups); e.g. 815.6 is grouped to 8 (Literature).
Grouping tables are defined through a separate function on the SSP start menu and will be described in detail later in this chapter.
Sort descending: If this property (checkbox) is not checked, the system will sort in ascending order (0, 1, 2, ... 99999, A, B, … Z). If checked, the system will sort in descending order (Z, Y, … A, 99999, 99998, … 2, 1, 0). See the earlier remarks on sort order for more detailed information on sort order. By default the order is ascending.
Special sorting method: For specific sorting of bibliographic records the system offers four special sorting methods. These are:
· Author
· SISO
· Title
· Year
These sorting methods are not available if you sort data other than bibliographic records. If you select a special sorting method, the sorting will be identical to the sorting applied in the WebOpac.
141.4.5 Example of sorting profiles and sorting criteria
This section contains an example of a sorting profile.
The system will sort the items on institution (sort criterion 1) and location (sort criterion 2).

141.4.6 Managing sorting profiles
Options available to manage sorting profiles
When managing sorting profiles, the following actions and tools are available:
|
Option (button) |
Use this option to |
|
Creating a new sorting profile |
Create a new sorting profile. |
|
Changing / update sorting profiles |
Delete or add criteria to a profile. |
|
Deleting sorting profiles |
Delete a sorting profile. |
|
Copy sorting profiles |
Copy sorting profiles between users and/or between applications. |
|
Change the properties of sorting profiles |
Change the name and / or comments of the profile. |
|
Lock / unlock a profile |
Lock or unlock a profile. |
|
View the sorting profiles of another user |
Navigate to the sorting profiles of another user; if you are allowed to use this option, you can then use those profiles as if they were your own. |
|
Navigate to the most recently created savelist |
View the contents of the most recently savelist; this function is particularly useful after you have run a sorting profile and you want to look at the result of the query. |
|
Run a sorting profile |
Execute a query. |
|
Set-up the parameters for an “export to the web” |
Set up parameters that will make sure that the results of the selected profile (i.e. the contents of a savelist) are automatically exported to the web. |
|
View associated savelists |
View or remove the associated savelists (this option is described in the chapter on savelists). |
We will describe a number of these actions in more detail in the following sections.
Workflow and organization of sorting profiles
Sorting profiles management is organized on two main screens:
· The main (top level) screen displays a list of sorting profiles and their most important properties (such as name, number of criteria, application, comments etc.).
· The detail (second level) screen displays the sorting criteria that are linked to the profile and the Boolean relation between those criteria.
Most options are available on both screens, but not all. The following tables show an overview of which options are available on which screen.
Options available on the main screen
|
Shortcut |
Option |
|
* |
Changing / update sorting profiles |
|
AS* |
Associated savelists |
|
B |
Previous |
|
C* |
Copy sorting profiles |
|
F |
Next |
|
G |
Navigate to the most recently created savelist |
|
I |
To create a new sorting profile |
|
L* |
Lock a profile |
|
PW |
View the sorting profiles of another user |
|
S* |
Deleting sorting profiles |
|
T* |
Change the properties of sorting profiles |
|
UL* |
Unlock a profile |
|
W* |
Set-up the parameters for an “export to the web” |
|
X* |
Run a sorting profile |
Shortcuts that end with an asterisk (*) require the selection of a profile.
Options available on the detail screen
|
Shortcut |
Option |
|
* |
Change criteria |
|
B |
Previous |
|
C |
Copy profile |
|
E |
Change file to select from |
|
F |
Next |
|
I |
New criteria |
|
G |
Navigate to the most recently created savelist |
|
L |
Lock a profile |
|
S |
Delete profile |
|
S* |
Delete sort criteria |
|
T |
View / change profile comments |
|
UL |
Unlock a profile |
|
V* |
Move criteria |
|
W |
Set-up the parameters for an “export to the web” |
|
X |
Run sorting profile |
Shortcuts that end with an asterisk (*) require the selection of a criterion.
141.4.7 Creating a new sorting profile
Creating a new sorting profile is a two step process, in which the second step is repeatable.
Step 1 – Define the general properties of the sorting profile.

After you have submitted the form, the system will automatically switch to the overview screen of sort criteria. You can now add one or more sort criteria.
Step 2 – Define one or more sort criteria.
See the screen shot at the beginning of the section on sorting profiles.
141.4.8 Copy a sorting profile
The Copy Sorting profile feature can be used to copy profiles:
· To another name
· and/or
· To another user
Copying to another name will just create a duplicate profile. Copying to another user will create the profile for that other user.
141.4.9 Lock / unlock a sorting profile
Sorting profiles can be locked by any user. This implies that the sorting profile cannot be modified anymore, not even by the person who locked it. The exceptions to this rule are users with system privileges, who can unlock the sorting profiles of any user.
This option is provided to lock profiles, so that one can be absolutely sure that their contents and properties will not change.
Note that, however, locked profiles can be copied.
141.4.10 View the sorting profiles of another user
To view the sorting profiles of another user, the system allows access to sorting profiles created by another user. Users with system privileges can access all the other users' sorting profiles. Other users can only access the sorting profiles stored under the fictitious user “General use” and under the fictitious user “Examples”. The sorting profiles stored as examples can be copied to your own sorting profiles; you can then modify the sorting profile if necessary.
141.4.11 Delete a sorting profile
When deleting a sorting profile, the system will ask for confirmation. If confirmed, the sorting profile will be removed from the system.
Note that savelists created with the sorting profile, will remain untouched.
141.4.12 Navigate to the most recently created savelist
You can navigate to the most recently created savelist. The system will show the record overview screen of the savelist.
Note that this is the savelist that has most recently been created, either by a selection or by a sort process.
141.4.13 Run a sorting profile
If you “run” (execute) a sorting profile, the system displays a form that allows you to define the process parameters. Each sort process that is started has a number of properties.

Process comments: This comment is added to the process. It is related to the process and not to the sorting profile or the result savelist. In the current version, there are no functions to view the “Process comments” at a later stage.
Run profile on savelist: This (“source”) savelist contains the records that will be sorted.
Note that this savelist cannot be identical to the result savelist.
Run profile on associated savelist: Sort actions can run on a specific type of savelist, called “associated savelists”. These are savelists that were previously used with the current sorting profile. “Associated savelists” provide a quick and easy access to the savelists that are likely to be the most relevant ones. See the section on “Associated savelists” in the chapter on Savelists.
Process file in reverse order: If this property is not set, the system will process the data in the file in the order in which the records are stored (typically this is in ascending order). However, you can specify that the process should run in “reverse order”.
Result savelist: The result savelist is the savelist in which the sorted records will be stored. This must be a new savelist.
Create unique savelist: If you set this property to Yes, the system will automatically create a unique result savelist, even if you select an existing result savelist. The system does this by adding an increment to the result savelist name.
Example: If you select the existing result savelist XXX and set the “Create unique savelist” value to Yes, the system will create the savelist XXX1.
Note in addition that, if there is already a digit or digits present in the name, the system increments the last digit of the result savelist, so using the existing savelist “2004” will result in the new savelist “2005”. In this case the system does not add an additional digit, but increments the already present last digit.
Remove existing content of result savelist: If you set this property to Yes, the system will remove the content of the result savelist. This property is obsolete for the time being, as the result savelist of a sort action has to be unique anyway.
Result savelist comments: This comment will be added to the result savelist.
141.4.14 Set-up parameters for an “export to the web”
The Export to the Web functionality allows you to attach to a sorting profile a number of parameters that will allow the system to link the result savelist(s) into WebOpac search trees automatically.
Note that this functionality is only available for savelists that contain bibliographic records.
Automatically include result savelist in WebOpac: If this property is set to Yes, the system will automatically make the result savelist available as a WebOpac savelist.
Include in Tree/Page: This property allows you to specify in which Page of which Tree you want to include the result savelist. The system shows all the Pages of all the WebOpac trees.
Wording [dut]: The description of the savelist in the search tree in Dutch.
Wording [eng]: The description of the savelist in the search tree in English.
Wording [fre]: The description of the savelist in the search tree in French.
Dynamic content update: If this property is set to Yes, the content of the WebOpac savelist will be updated automatically if the content of the SSP savelist changes.
141.4.15 Change the properties of a sorting profile
The system allows you to change to general properties of a sorting profile; the name of the profile and its comments. If you change the name, the system will ask for confirmation.
141.4.16 Add criteria to a sorting profile / Change criteria in a sorting profile
If you want to add criteria to a sorting profile, the system will display the following form:

This form allows you to define the following properties:
Criteria: Select a criterion from the list.
Repeat value: Define a value of 1 or higher.
Grouping table: Select a grouping table from the list.
Sort descending: Set this property to Yes if you want the records to be sorted in descending order.
All these elements have been explained in detail in previous sections of this chapter.
141.4.17 Delete sorting criteria from a profile
You can delete criteria from a sorting profile. The system will ask for confirmation.
141.4.18 Move criteria in a sorting profile
You can move criteria in a sorting profile as follows:
1. Select the criterion you want to move to another place in the list.
2. Activate the “Move criteria” button.
3. Indicate to which place in the list the selected criterion should be moved. (Note that this results in a Move, not in a Replace.)
141.4.19 Change “file to select from”
If you want to add sort criteria to a profile that are not “located” in the data file you are currently selecting from, but are “located” in other data files, you can use the “Change File to select from” option. The system will show you all the files you can link to. Select a file. If you then add a new criterion, you will notice that the system now displays the data elements from the chosen file.
See the section on Automatic links between files.
The files that are available are determined as follows:
1. The system maintains a system file that contains all the links that are theoretically possible (e.g. file A has a link to file B; file B has a link to file C, etc.).
2. The system automatically creates “iterative” links to other files.
· Example: If you are selecting from file A, which has a link to file B, which in its turn has a link to file C, file C will also appear in the list of available link files.
See the section on Automatic file linking for an overview of the valid links between files.
141.5 Publish
141.5.1 Introduction
SSP can publish or export data in multiple formats and the output can be redirected to multiple “targets”.
SSP can format text as:
· Delimited (text)
· Text
· HTML
· XML
· ISO2709 (for bibliographic data only)
The output can be redirected to the following targets:
· Browser (e.g. Internet Explorer)
· Spreadsheet (e.g. Excel)
· Word processor (e.g. Word)
· File
· Printer
· Printer spooler
· Screen (normally Notepad will be opened)
· E-mail (the output will be attached to the email)
See the section on linking and output in the chapter on system management for more information on these topics.
141.5.2 The publishing process
SSP publishing concepts
The SSP publishing process uses the concept of publishing profiles; criteria are grouped into a profile. This profile is then used to publish data about records that are contained in a savelist.
The following short description describes the two basic concepts of an SSP publishing process:
· Publishing profiles
· and
· Running the actual publishing action
Each of these concepts is described in detail in this chapter.
Publishing profiles
SSP publishing is based on the “profiles” concept, which implies the following. Publishing criteria are grouped into profiles, which can be used again and again (“define once, use many times”). A publishing profile can be very simple or very complicated and can be private or shared.
The structure of publishing profiles is more complex than that of selection or sorting profiles. More details follow in other sections of this chapter.
Running publishing processes
A publishing process always runs on a savelist; it cannot run immediately on a “basic” file (e.g. a bibliographic database). The savelist on which the publishing action runs is not a property of the publishing profile, but a property of the specific publishing action.
Publishing actions can only be run online.
141.5.3 The structure of publishing profiles
A publishing profile is structured as follows:
·
Profile
àhas Profile properties
àhas Page properties
àconsists of one or more Groups
·
Group
àhas Group properties
àconsists of one or more Columns
·
Column
àhas Column properties
àconsists of one or more Data Elements
·
Data Element
àhas Data Element properties
This structure reflects a hierarchy Profile – Group – Column – Data Element. The Page properties do not fit into this hierarchical structure and stand more or less outside it.
From the bottom up the structure looks as follows:
A Data Element is the smallest component within a publishing profile and usually maps to a data element from the database (e.g. the name of a borrower, the gender of a borrower, the item category of an item, the title from a bibliographic record, etc.).
A Column is the container for one or more Data Elements. Often a column will only contain one Data Element, but there are no restrictions on multiple data elements in a single column (e.g. a column contains two borrower data elements; the postal code and the place. A column contains two bibliographic data elements; main title and parallel title).
Note that in this context “Column” is also used for data that is not presented in column format, but as “labelled” data.
A Group is the container for one or more Columns. A Group has a type, which is either “Column”, “Labels fixed” or “Labels free”. These three types reflect the “data-direction”, i.e. the direction in which the data will be published. We will give an example of each data-direction to illustrate this (in each example the same data is published).
Data-direction “Column”
In the example the data is displayed in four columns; Name, Gender, Postcode and Place are published.
|
Name |
Gender |
Postcode |
Place |
|
Tiffany PlayMobile |
Female |
1234 AB |
Toronto |
|
Harry Lego |
Male |
2345 CD |
Paris |
|
Benny Ikea |
Male |
3456 EF |
Bristol |
Data-direction “Labels fixed”
The data is now published as “Labels fixed”, which means that each data element is published as a “Label” / “Data element” pair. One can view this data-direction type as a display in two “columns”; one containing the label, the other the actual data.
|
Name |
Tiffany PlayMobile |
|
Gender |
Female |
|
Postcode |
1234 AB |
|
Place |
Toronto |
|
|
|
|
Name |
Harry Lego |
|
Gender |
Male |
|
Postcode |
2345 CD |
|
Place |
Paris |
|
|
|
|
Name |
Benny Ikea |
|
Gender |
Male |
|
Postal code |
3456 EF |
|
Place |
Bristol |
Data-direction “Labels free”
The data is now published as “Labels free”. Here the data is again published as “Label” / “Data element” pairs. The difference with “Labels fixed” however is that the display of the actual data starts immediately after the display of the label.
Name: Tiffany PlayMobile
Gender: Female
Postcode: 1234 AB
Place: Toronto
Name: Harry Lego
Gender: Male
Postcode: 2345 CD
Place: Paris
Name: Benny Ikea
Gender: Male
Postcode: 3456 EF
Place: Bristol
A Profile is the container for one or more Groups. Usually a Profile will consist of one Group, but if one wants to combine multiple data-directions into a single Profile, multiple Groups will have to be created.
Example
The following example shows a combination of two Groups in one profile.
DM 85 La chèvre de Monsieur Seguin
07/01/2002 / BD
DM 33 Sciences et vie junior -- revisited jun12 [Playstation 2].
- 0294-0000
12/06/2003 / WP
03/05/2002 / BD
000 Qu'il y a-t-il de plus beau que l'émerveillement d'un
enfant devant un lièvre ? : De quoi elle cause cette
notice ? / Servier Evelyne. - Servier, Evelyne
06/03/2002 / BD
DM QA 1338 Le Grand Hôtel Français WITHOUT AN AUTHOR BUT THE WORD
KING IS HERE est situé place de la Nation, un des grands
carrefours de Paris. Nation est situé à 5 mn de la
Bastille, du Marais et de Saint-Paul. (Métro Rue des
Boulets ou Nation) and the king. - 0-380-72088-4. - QA
Publishing
03/04/2002 / WP
03/04/2002 / WP
840-3 ARN a L'antizyklon des atroces [Boek]. - Arnaud, Georges J. - 94
p. ; 21 cm. - 2-290-31529-X. - [Paris] : Librio, 2001
27/06/2002 / BD
20/05/2003 / WP
If we analyze this example, it looks as follows. The profile consists of two groups.
· The first group is of the “Column” type and contains two columns. The first one displays the data element Shelfmark, the second one the data element ISBD. The column header labels are set to empty, so they do not display.
· The second group is of the “Labels fixed” type and contains only two “columns” (as explained before, we use the terminology “column” also for data formatted as label / data pairs). The label is set to empty, so it is not visible. The data column contains two data elements (that are separated by a “ / ” [blank slash blank]) “date of entry” of the items attached to the bibliographic description and the “location” they belong to.
The properties of each of the logical structures are described in detail in the following sections.
141.5.4 Profile and Page properties
You can define a large number of properties to modify the content and format of the document that will be published.
The following properties can be defined for a publishing profile.
Note that not all properties apply in all cases.
Profile properties
These properties apply to the entire document.
Name: The name of the profile.
Profile type: This is Delimited, Text, HTML or XML. The profile type is vital for the look and feel of the output and determines which other parameters apply. Note that changes to the profile type are limited once a profile has been created.
Locked: The profile can be locked (not accessible) or free.
Application: This is the ID of the application for which the publishing profile can be used. See the section on savelists for an overview of available applications.
Comments: Free text comments about the profile.
Document header: This is the text that is displayed at the beginning of the output and it appears only once in the whole document. It should not be confused with the page header, which appears at the top of each page.
Document footer: This is the text that is displayed at the end of the output and it appears only once in the whole document. It should not be confused with the page footer, which appears at the bottom of each page.
Groups: The list of groups that are defined for the profile.
Page properties
Page properties are the properties that are defined for a page. They differ from profile type to profile type but are only relevant for profiles of the type “Text” or “Delimited” because the “HTML” and “XML” type profiles have no page properties.
The following properties apply to “Text” type profiles.
Lines per page: The number of lines per page.
Characters per line: The number of characters per line.
Page header: This is the text that is displayed at the top of each page. It should not be confused with the document header which appears only at the beginning of the document.
Page footer: This is the text that is displayed at the bottom of each page. It should not be confused with the document footer which appears only at the end of the document.
The following properties apply to “Delimited” type profiles.
Delimiter: This is the delimiter that will be used to separate the data. If you use the publishing profile to activate a direct link to Excel, you must select the correct delimiter for the Excel version you are using. If you set this parameter correctly, Excel will be able to put the data into the correct columns. The delimiter varies from Excel version to Excel version; usually it is a comma (,) or semi colon (;).
Data surrounded by quotes: If you export your data in “Delimited” format to a file, it is not necessary to set this property to Yes. However, if you use the profile to activate a direct link to Excel, it is advisable to set this property to Yes. This will enable Excel to recognize the data correctly and avoid problems with delimiters. If the data is surrounded by quotes Excel will be able to distinguish between the delimiter itself and the same character when it appears in data strings.
141.5.5 Group properties
You can define a large number of properties to modify the content and format of the document that will be published.
The following properties can be defined for a Group.
Note that not all properties apply in all cases.
Group properties
These are properties that apply to a so-called “Group”. A profile can consist of one or more Groups.
Direction type: The direction type is either “Column”, “Labels fixed” or “Labels free”. See the comments in previous sections for a better understanding of this direction type. The direction type is vital for “Text” and “HTML” type output and cannot be modified once it has been defined.
Columns list: The list of columns that are defined for the profile.
Group class: The style class that is applicable to the whole group. Styles are discussed in a separate section of this document and only apply to “HTML” output.
141.5.6 Column properties
You can define a large number of properties to modify the content and format of the document that will be published.
The following properties can be defined for a column. Note that not all properties apply in all cases.
Warning
For profiles that have the direction type “Column” each Column has to have a group of column properties and one or more data elements.
For profiles that have the direction type “Labels free” or “Labels fixed” however, it is important to realize that each label / data pair (as explained previously) maps to two columns in the profile definition, one for the label and one for the data.
Column properties
These are properties that apply to the so-called “Columns”. A group can consist of one or more Columns. As stated before, the terminology “Column” is not only used for groups that have the direction type “Column”, but also for those that have the direction type “Labels free” or “Labels fixed”.
Note that not all these properties apply in all cases (i.e. for all types of profiles).
Case: This property can be used to transform the case to uppercase or lowercase.
Clean blanks: This property can be used to clean the data (remove all leading, trailing and double blanks).
Class: The style class that is applicable to the whole column.
Maximum number of characters: The maximum number of characters allowed in the column (i.e. in a “cell” of the column).
Text above: The text that should be displayed as column header.
Text after: The text that should be displayed after the actual data. It should not be confused with the “Text after” property of individual data elements.
Text before: The text that should be displayed before the actual data. It should not be confused with the “Text before” property of individual data elements.
Typography: This property can be used to transform the typography (e.g. from “rich” to “poor” which will transform all diacritics e.g., “Böll” to “Boll”). The property is not in use.
Width: The width of the column.
Exclude empty labels: If this property is set to Yes, the system will skip all label / data pairs for which no data is defined. The property is only relevant for groups that have a “Labels free” or “Labels fixed” direction type.
The following example illustrates the effect of this property. We publish from a borrower record that doesn't contain a Street or Phone number. The “Exclude empty labels” property is set to No:
Name: Tiffany PlayMobile
Gender: Female
Postcode: 1234 AB
Place: Toronto
Street:
Phone number:
Mobile number: 0656752723
If we publish the same data with the “Exclude empty labels” property set to Yes, the output will look like:
Name: Tiffany PlayMobile
Gender: Female
Postcode: 1234 AB
Place: Toronto
Mobile number: 0656752723
Note that the labels Street and Phone number do not appear in the output.
Data element list: The list of data elements that is included in the column.
141.5.7 Data element properties
You can define a large number of properties to modify the content and format of the document that will be published.
The following properties can be defined for a data element.
Note that not all properties apply in all cases.
Data element properties
These are properties that apply to the so-called “Data elements”. A column can consist of one or more items. Note that in this context “Data element” does not necessarily refer to data that is stored in the database, but can also refer to e.g. a label that precedes the database data.
Class: The style class that is applicable to the item.
Case: This property can be used to transform the case to uppercase or lowercase.
Clean blanks: This property can be used to clean the data (remove all leading, trailing and double blanks).
Data element: The data that is to be published (e.g. the name of a borrower, the title of a bibliographic description, the last checkout date of an item, etc.).
You can use the button on the form to view the primary characteristics of the Data element.
Date / time class: The date / time class that is to be used to format a date or time. Please see the remark about the relationship between Date / time classes and Grouping tables in the description of the Grouping table property.
Do not print between end: This property can be used to remove certain parts of the data being published.
Do not print between start: This property can be used to remove certain parts of the data being published.
Fill empty fields: This value is only used for delimited output and can be used to avoid “empty” cells in the output.
The following examples illustrate this:
The following output contains three columns: title, date of publication and author; the last field is repeatable.
When the “Fill empty fields” is set to ‘No' the result is:
|
Red dress |
2004 |
Tiffany PlayMobile |
|
|
|
Benny Bear |
|
|
|
Harry Police |
|
Marine Research |
2003 |
Johnny Weismuller |
|
|
|
Lieke Duck |
|
Winter is the coldest |
2003 |
Evelyne Wonder |
When the “Fill empty fields” is set to ‘Yes' the result is:
(The effects of this property change are marked in bold (only for didactic purposes).)
|
Red dress |
2004 |
Tiffany PlayMobile |
|
Red dress |
2004 |
Benny Bear |
|
Red dress |
2004 |
Harry Police |
|
Marine Research |
2003 |
Johnny Weismuller |
|
Marine Research |
2003 |
Lieke Duck |
|
Winter is the coldest |
2003 |
Evelyne Wonder |
Grouping table: This is the grouping table that should be used. If you include both a grouping table and a date/time class, you should be aware of the fact that the result can be incorrect. In other words: if you want e.g. to group dates on weekdays (all Mondays, all Tuesdays, etc.), you should use the grouping table Weekdays and not include a date/time class.
Interpret: This property is not in use.
Maximum number of characters: The maximum number of characters allowed.
Minimum number of lines: The minimum number of lines that will be included in the output. If the data being published is shorter than this minimum value, the system will automatically add blank lines.
Maximum number of lines: The maximum number of lines that will be included in the output. If the data being published is longer than this maximum value, the system will restrict the maximum length to this value.
Print from: This property can be used to remove certain parts of the data being published.
Print until: This property can be used to remove certain parts of the data being published.
Repeating value: This property can be used to restrict the number of instances being published (this is only relevant in the case of repeating data elements; e.g. do not publish all authors, but only one).
Reverse: This property can be used to reverse names (“Moon, B.” is to be published as “B. Moon”). The system basically inverts the data from fields that have a “LastName, FirstName” structure.
Text column: This contains the text that is published as label for groups that have the direction type “Labels free” or “Labels fixed”.
Text after: The text that should be displayed after the actual data.
Text before: The text that should be displayed before the actual data.
Typography: This property can be used to transform the typography (e.g. from “rich” to “poor”, which will transform all diacritics, e.g. “Böll” to “Boll”). This property is not in use.
141.5.8 Managing publishing profiles
Options available for managing publishing profiles
When managing publishing profiles, the following actions and tools are available:
|
Option (button) |
Use this option to: |
|
Creating a new publishing profile |
Create a new publishing profile manually. |
|
Changing / update publishing profiles |
Delete or add criteria to a profile. |
|
Deleting publishing profiles |
Delete a publishing profile. |
|
Copy publishing profiles |
Copy publishing profiles between users and/or between applications. |
|
Change the properties of publishing profiles |
Change the name and/or comments of the profile. |
|
Wizard |
Create a new publishing profile by using the Profile Creation Wizard. |
|
Lock / unlock a profile |
Lock or unlock a profile. |
|
View the publishing profiles of another user |
Navigate to the publishing profiles of another user; if you are allowed to use this option, you can then use those profiles as if they were your own. |
|
Navigate to the most recently created savelist |
View the contents of the most recently savelist; this function is particularly useful after you have run a publishing profile and you want to look at the result of the query. |
|
Run a publishing profile |
Execute a query. |
|
View associated savelists |
View or remove the associated savelists (this option is described in the chapter on savelists). |
We will describe a number of these actions in more detail in the following sections.
Workflow and organization of publishing profiles
Publishing profiles management is organized on two main screens:
· The main (top level) screen displays a list of publishing profiles and their most important properties (such as name, number of criteria, application, comments and others).
· The detail (second level) screen displays the publishing criteria that are linked to the profile and the Boolean relation between those criteria.
Most options are available on both screens, but not all. The following tables show an overview of which options are available on which screen.
Options available on the main screen
|
Shortcut |
Option |
|
* |
Change / update publishing profiles |
|
AS* |
Associated savelists |
|
B |
Previous |
|
C* |
Copy publishing profiles |
|
F |
Next |
|
G |
Navigate to the most recently created savelist |
|
I |
Create a new profile manually |
|
L* |
Lock / unlock |
|
PW |
View the publishing profiles of another user |
|
S* |
Delete publishing profiles |
|
T* |
Change the properties of publishing profiles |
|
UL* |
Unlock a profile |
|
W |
Profile creation wizard |
|
X* |
Run a publishing profile |
Shortcuts that end with an asterisk (*) require the selection of a profile.
Options available on the detail screen
Shortcut |
Option |
|
* |
Select item (to view or change [group, column or data element] properties) |
|
B |
Previous |
|
C |
Copy profile |
|
E |
Change file to select from |
|
F |
Next |
|
IA* |
Add data element (item) |
|
IE* |
Add column |
|
IG* |
Add group |
|
G |
Navigate to the most recently created savelist |
|
L |
Lock profile |
|
M* |
Move item |
|
PP |
Page properties |
|
Q |
Quick change lay-out |
|
S |
Delete profile |
|
S* |
Delete item |
|
T |
View / change profile properties |
|
UL |
Unlock profile |
|
V* |
Move criteria |
|
X |
Run publishing profile |
Shortcuts that end with an asterisk (*) require the selection of an item on the screen.
141.5.9 Creating publishing profiles - introduction
The system has three procedures for defining output profiles:
· Creation of profiles using a wizard.
· Manual creation of profiles.
· Fully automated, non interactive output.
Unless you want to achieve very specific effects, we advise you to always create the profile using the wizard.
Wizard: The wizard guides you through the definition of output profiles in just a few steps.
Manual creation: Manual definition of profiles offers all the functionality available for defining output profiles, but is more complex than using the wizard.
Fully automated, non interactive: Fully automated, non interactive output is only intended for bibliographic data and includes the following formats:
· ISO2709
· Labelled (tagged)
· Delimited
· Fixed length
These are based on the export functionality as described in the chapter on cataloguing, but are accessible from within SSP. As they are not really a part of the SSP module, they are not discussed any further in this chapter.
141.5.10 The profile creation wizard
The easiest way to create a publishing profile is to use the profile creation wizard. In a few steps you can define a publishing profile, just by answering a few questions. We include a short overview of the wizard.
Note that, depending on your choices, some screens may look different. This section should only be seen as an example.
Note also that the wizard will create a profile that contains only one “Group”.
Step 1: – Define profile name and, optionally, comments.
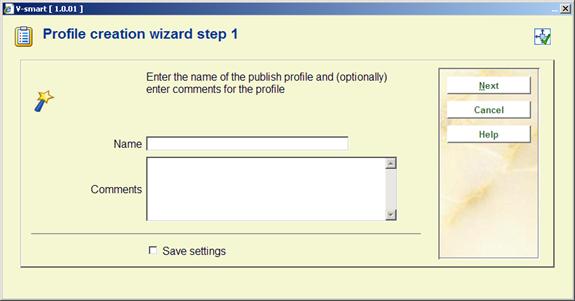
Give the profile a logical name. We advise you to add sensible comments to the profile, especially if you have a large number of profiles, as it will make it easier to find the correct profile.
Step 2: – Define the data file to select from.

Note that this choice determines which savelists will be available to publish with this profile. It does not imply that you can only publish data from the file that you choose here.
Step 3: – Define the publishing profile type.

Define in which format you want to publish the data. This type can be changed at a later stage, although there are restrictions on changing this type.
Step 4: – Define the “direction type” (see below).
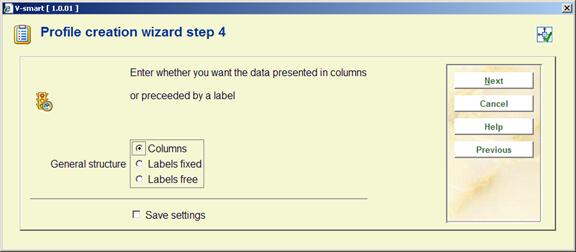
The data-direction is an important property as it defines the direction of the data in the output. See the section on data-direction for more information.
Step 5: – Define the data elements to be included in the profile.
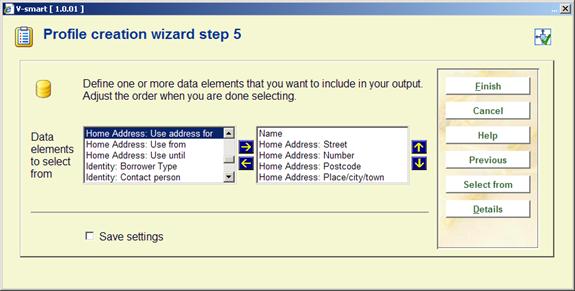
Select the data elements that you want to include in the output and determine the order in which they should be presented. After you have done this, click on the Finish button. The profile has now been created and can be used to publish data.
If you want to select data from another file, you can use the button to select another file. After this has been done, you can select criteria from the other file. They will be added to the original list.
Example: You are publishing Item information and you want to include bibliographic information too. Act as follows:
1. First select the data elements from the Item file that you want to publish.
2. Click on the button.
3. Select the Bibliographic file from the dropdown list of files.
4. The system now re-displays the window that offers the ability to select data elements (in our example these are now examples from the Bibliographic file). Select the data elements that you want to include in the profile.
You can repeat these steps multiple times.
141.5.11 Creating a new publishing profile manually
Creating a new publishing profile is a multi step process. Step 1 is not repeatable; all other steps can be repeated.
Step 1: – Define the general properties of the publishing profile.

You can now define the basic properties of the publishing profile:
· Name
· Comments
· Profile type
· File to select from
Step 2: – Create Groups, Columns and Data Elements
After you have submitted the form, the system will automatically switch to the overview screen of the publishing profile. You can now start to add elements to the publishing profile. This is an iterative process that involves adding one or more Groups, one or more Columns within each Group and one or more Data elements within each Column.
If you are creating a profile of the Column type proceed as follows:
|
1. |
|
Add a first column. Click on the General information line of the first group and then click on the button. |
|
|
|
|
|
2. |
|
The system displays an input form. Fill in any parameters that you want (e.g. give the property Text above the value that you want to appear as the column header). Submit the form by clicking on the button. |
|
|
|
|
|
3. |
|
The system now returns to the overview screen of the profile. Click on the line Column information of the first column and then click on the button. |
|
|
|
|
|
4. |
|
The system displays a form that allows you to choose the data type. This can be either “Data”, “Text” or “Presentation element”. Choose “Data” if you want to select data from the database. Submit the form by clicking on the button. |
|
|
|
|
|
5. |
|
You are now presented with a form that allows you to define a number of properties for the data element. The most important one is the first one, “Data element”, which allows you to define which data field from the database should be included. Submit the form by clicking on the button. |
|
|
|
|
|
6. |
|
The system now returns to the overview of the profile. You now have a valid profile and you can continue with adding more data elements, columns or groups. |
If you are creating a profile of the Labels free or Labels fixed type proceed as follows:
|
1. |
|
Add a first column. Click on the General information line of the first group and then click on the button. |
|
|
|
|
|
2. |
|
The system displays an input form. Fill in any parameters that you want (e.g. give the property Text above the value that you want to appear as the column header). Submit the form by clicking on the button. |
|
|
|
|
|
3. |
|
The system now returns to the overview screen of the profile. Click on the line Column information of the first column and then click on the button. |
|
|
|
|
|
4. |
|
The system displays a form that allows you to choose the data type. This can be either “Data”, “Text” or “Presentation element”. Choose “Text” to define the label. Submit the form by clicking on the button. |
|
|
|
|
|
5. |
|
You are now presented with a form that allows you to define a number of properties for the data element. The most important one is the first one, “Text column”, which allows you to define the text that is to be displayed as label. Submit the form by clicking on the button. |
|
|
|
|
|
6. |
|
The system now returns to the overview screen of the profile. Click on the line Column information that you added previously and then click on the button. |
|
|
|
|
|
7. |
|
The system displays a form that allows you to choose the data type. This can be either “Data”, “Text” or “Presentation element”. Choose “Data” to select data from the database. Submit the form by clicking on the button. |
|
|
|
|
|
8. |
|
You are now presented with a form that allows you to define a number of properties for the data element. The most important one is the first one, “Data element”, which allows you to define which data field from the database should be included. Submit the form by clicking on the button. |
|
|
|
|
|
9. |
|
The system now returns to the overview of the profile. You now have a valid profile and you can continue with adding more data elements, columns or groups. |
You can add additional data elements, columns or groups by choosing one of the following three icons (options):
|
|
Add group |
To add a group, click on one of the lines of the Group after which you want to insert the new Group. |
|
|
Add column |
To add a column, click on one of the lines of the Column after which you want to insert the new Column. |
|
|
Add data element (item) |
To add a data element, click on the line after which you want to insert the new Data element. |
Modifying a profile manually is not always trivial. Here are some additional guidelines you should follow to avoid creating incorrect publishing profiles:
1. A profile should contain at least one group.
2. A group should contain at least one column.
3. A group that has the direction-type “labels free” or “labels fixed” should contain at least two columns (one for the label and one for the associated data from the database).
4. A column should contain at least one data element.
141.5.12 Copy a publishing profile
The Copy Publishing Profile feature can be used to copy profiles:
· To another name
· and/or
· To another user
Copying to another name will just create a duplicate profile. Copying to another user will create the profile for another user.
When you copy a profile, the system will offer you the opportunity to also copy the following related elements of the profile:
· Copy all related classes
· Copy all related date/time classes
· Copy all related grouping tables
· Copy all related document texts
· Copy all related page texts
· Copy all related text blocks
The ability to copy all related elements is especially relevant whenever you copy the publishing profile to another user. As the copied profile may contain references to classes and other elements that do not necessarily exist for the user to which you copy, the related classes and other elements will be copied automatically too.
141.5.13 Lock / unlock a publishing profile
Publishing profiles can be locked by any user. This implies that the publishing profile cannot be modified by anyone, not even the person who locked it. The exceptions to this rule are users with system privileges, who can unlock the publishing profiles of any user.
This option to lock profiles is provided so that one can be absolutely sure that their contents and properties will not change.
Note however that locked profiles can be copied.
141.5.14 View the publishing profiles of another user
The system allows certain users access to publishing profiles created by other users. Users with system privileges can access all other users' publishing profiles. Other users can only access the publishing profiles stored under the fictitious user “General use” and under the fictitious user “Examples”. The profiles stored as examples can be copied to your own profiles and you can then modify them if necessary.
141.5.15 Delete a publishing profile
When deleting a publishing profile, the system will ask for confirmation. If confirmed, the publishing profile will be removed from the system.
Note that related elements, such as classes or document headers, are not deleted when a publishing profile is deleted.
141.5.16 Navigate to the most recently created savelist
You can navigate to the most recently created savelist. The system will show the record overview screen of the savelist.
Note that this is the savelist that has been most recently created, either by a selection or by a sort process; it is not the savelist that has been most recently published.
141.5.17 Run a publishing profile
If you “run” (execute) a publishing profile, the system displays a form that allows you to define the process parameters. Each publishing process that is started has a number of properties.
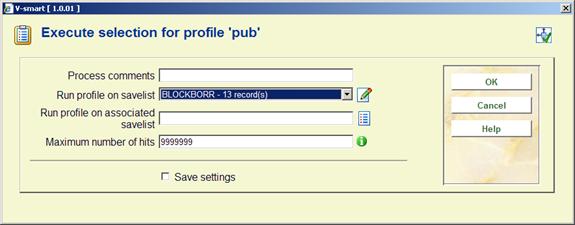
Process comments: This comment is added to the process. It is related to the process and not to the publishing profile or the resulting savelist. In the current version, there are no functions to view to “Process comments” at a later stage.
Run profile on savelist: This savelist contains the records that will be published.
Run profile on associated savelist: Publishing actions can run on a specific type of savelists, called “associated savelists”. These are savelists that have been previously used with the current publishing profile. Associated savelists provide a quick and easy access to the savelists that are likely the most relevant ones. See the section on “Associated savelists” in the chapter on Savelists.
Maximum number of hits: You can restrict the number of records that are to be published, e.g. to test a profile.
If you try to run a profile that does not have the correct structure (e.g. because it does not contain any columns), the system will show you an appropriate warning.
141.5.18 Change the general properties of a publishing profile
The system allows you to change the general properties of a publishing profile. These are:
· The name of the profile
· The comments
· The profile type
· The document header
· The document footer
· The page header
· The page footer
Note that not all properties apply to all profile types. If not applicable, options will be greyed out.
If you change the name, the system will ask for confirmation.
You must be aware of the fact that there are restrictions on changing the profile type. You must also realize that if you change a profile type from type A to type B, you cannot necessarily change it back to type A.
141.5.19 Change the page properties
The system allows you to change the page properties. The page properties depend on the profile type.
Profile type Text: The following page properties can be modified:
· Lines per page
· Characters per line
The form that allows you to modify the page properties contains much more information than just these two properties; all other properties however are greyed out as they are not active.
Note that page header and page footer are changed as part of the General properties of the profile.
Profile type Delimited: The following page properties can be modified:
· Delimiter
141.5.20 Change the properties of groups, columns or data elements
The system allows you to change the properties of groups, columns and data elements by clicking on the appropriate items on the screen.
· Group properties can be changed by clicking on the “General information” line within a group.
· Column properties can be modified by clicking on the “Column information” line within a column.
· Data element properties can be modified by clicking on the “Text” or “Data” lines within a column.
141.5.21 Delete elements from a profile
You can delete elements from a publishing profile by clicking on the appropriate screen item (a line in the display). You have to be very careful deleting elements from a profile, as a delete at a higher level also deletes the elements that are located lower in the hierarchy.
· If you delete a group, all the columns within the group will be deleted and, as consequence, all the data elements within the group will also be deleted.
· If you delete a column, all the data elements within the group will be deleted.
In all cases an appropriate warning message will be displayed and confirmation will be requested.
You cannot delete the last group in a profile, as this will delete the whole profile. To delete the whole profile, use the “Delete profile” button in the button bar.
As explained in other sections of this document, the elements in profiles of the types “Labels free” and “Labels fixed” are stored as Label / Data pairs. Note that deletion of a label without deletion of the corresponding data element (or vice versa) will result in an invalid profile.
There is no “Undo” for delete actions. If you are going to modify complex profiles, we advise you to make a copy of the profile before you start making changes.
141.5.22 Move elements in a publishing profile
You can move elements in a publishing profile as follows:
1. Select the element you want to move to another place in the list.
2. Activate the “Move criteria” button.
3. Indicate to where in the list the selected criteria are to be moved. (Note that this results in a Move not in a Replace.) If you indicate a location that is higher than the highest element in the profile, the element will be moved to the end of the list.
141.5.23 Quick lay-out changes
The system offers the ability to quickly change the lay-out of a complete document. This is particularly relevant if you want to change the classes of all or multiple elements in a profile.
: If you invoke the Quick lay-out changes option, the system displays a form that allows you to change the following properties:
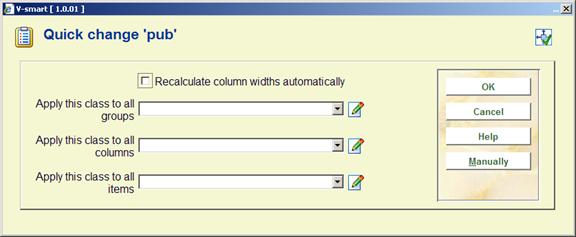
Recalculate column widths automatically: If you set this property to Yes, the system will automatically calculate the column width. This is done by dividing the line width by the number of columns (the remainder is added to the first column).
Apply this class to all groups: Select a style class from the list. The system will apply this class to all the groups in the profile.
Apply this class to all columns: Select a style class from the list. The system will apply this class to all the columns of all the groups in the profile.
Apply this class to all items: Select a style class from the list. The system will apply this class to all the items of all the columns of all the groups in the profile.
More detailed changes: If you want to make other, more detailed quick lay-out changes, you can invoke the button on the above form.
: The system shows an alternative view of the structure of the elements of the publishing profile. The following properties are displayed in separate columns:
· Element id (“level”)
· Structure (element type)
· Position (alignment)
· Content (data element id or label text)
· Width (column width)
· Class (style class)
The following options are available for general change:
|
Shortcut |
Option |
|
* |
Select an item from the list |
|
B |
Previous page |
|
C |
Change classes |
|
F |
Next page |
|
UC |
Undo changed classes |
|
UW |
Undo calculated column widths |
|
W |
Calculate column widths |
Shortcuts that end with an asterisk (*) require the selection of a profile.
: If you select an item from the list, the system will allow you to change the class and (if applicable) width of the chosen element (group, column or item). Optionally you can copy the new setting to all other similar elements:
· For a group: To all other groups.
· For a column: The class can be copied to all other columns; the width can be copied to all left or right columns (this is relevant for the columns of a group that has a direction-type of either “Labels free” or “Labels fixed”. For such a group the columns are in fact Label / Data pairs; if you select a left column (the label) you can copy the width to all other left columns; if you select a right column (the data) you can copy the width to all other right columns).
· For an item: To all other items.
: The system allows you to change the style classes of all groups, columns and items.
· Apply this class to all groups
- Select a style class from the list. The system will apply this class to all groups in the profile.
· Apply this class to all columns
- Select a style class from the list. The system will apply this class to all columns of all groups in the profile.
· Apply this class to all items
- Select a style class from the list. The system will apply this class to all items of all columns of all groups in the profile.
: You can use this option to undo the last style class change. Only the last change action can be undone.
: If you set this property to Yes, the system will automatically calculate the column width. This is done by dividing the line width by the number of columns (the remainder is added to the first column).
: You can use this option to undo the last column width change. Only the last change action can be undone.
141.5.24 Change “file to select from”
If you want to add publishing criteria to a profile that is “located” in a different data files to the one you are currently selecting from, you can use the option. The system will show you all the files you can link to. Select a file. If you then add a new criterion, you will notice that the system now displays the data elements from the chosen file.
See the section on Automatic links between files.
The files that are available are determined as follows:
1. The system maintains a system file that contains all links that are theoretically possible (e.g. file A has a link to file B; file B has a link to file C etc.).
2. The system automatically creates “iterative” links to other files. (As an example; if you are selecting from file A, which has a link to file B, which in its turn has a link to file C, file C will also appear in the list of available link files.)
See the section on Automatic file linking for an overview of the valid links between files.
141.6 Statistics – Introduction & snapshots
141.6.1 Concepts and principles
Although similar in many ways to “SSP select, sort and publish”, “SSP statistics” uses a number of different concepts. The basic concepts are described in this section.
Overall structure
The system differentiates between the following related concepts:
· Statistical snapshot profiles
- A statistical snapshot profile can be compared to a selection profile. A statistical snapshot profile contains only selection criteria (e.g. gender, date of birth, etc.). This profile is used to create statistical snapshots.
· Statistical snapshots
- A statistical snapshot is the result of the execution of a statistical snapshot profile. It is a one time data snapshot and contains, per record, a number of data elements. These snapshots are selective copies of data from a file, making this data available for future use. Or, in other words: a statistical snapshot is a snapshot of a data file that is stored for later statistical purposes. Typically, snapshots will be created by batch (night) processes without human intervention; this makes the data available to generate statistical reports.
· Statistical publishing profiles
- A statistical output profile can be compared to a combination of a selection and a publishing profile. It runs a selection on a statistical snapshot or on data from the database and sends the results an associated application (browser, Excel, etc.). Statistical publishing profiles can be linked to the statistical snapshot profiles.
· Note that it is possible to generate statistical reports without creating snapshots.
Advantages and disadvantages of using “snapshots”
The main advantages of using snapshots are:
· It creates the ability to produce statistical reports for historical data, long after the snapshot was created. For example, it can give an answer to questions such as “how many borrowers did I have on June 1, 2003?” even though the current date is September 10, 2004.
· It allows flexible and reasonably fast reports for any given combination of data that has been stored in the snapshot result. When compared to SSP selections the creation of the output result will be considerably faster, that is after the initial snapshot has been created.
· It creates a solution for “changing” data (historical versus actual values). For example, a report on circulation transactions is run on (current date) September 10, 2004 for the month June 2003. The report shows borrower categories; in the report there is a borrower X, who belonged to borrower category ABC in June 2003 but to borrower category DEF in September 2004. The snapshot technique allows the report to be as correct as possible i.e. borrower X will show up in the category ABC and not in DEF.
The main disadvantages of using snapshots are:
· Each snapshot made will consume a significant amount of disk space. Libraries that generate and store snapshots on a regular basis will see a heavy impact on disk space.
· Once a snapshot has been made, it is impossible to change the statistical criteria. This, however, should not be a major disadvantage, as new snapshot profiles can be created at any time.
Statistical criteria
In theory, all selection and sorting criteria can be statistical criteria. In practice however, there will be little or no need to have each selection criterion available as a statistical criterion.
In principle, there should not have to be a limit to the number of statistical criteria in one scan profile. However, the maximum data length in the snapshot is 30,000 characters per record. Given this fact, an arbitrary maximum of 100 statistical criteria in one scan has been imposed.
Note that cross-file statistical reports are possible.
Repeating data
Statistical reports are based on the assumption that the total amount of records in the report equals the total amount of records in the data file for which the report has been generated. This implies that, for repeating data, only the first value is taken into account.
For example, if a report has been created for items, showing a distribution between genres, each item will only be present in one genre (in the report), even if there are more genres attached to an individual record (in the bibliographic data file).
Transactions versus Actions
For circulation transactions the number of records displayed can be confusing. This confusion arises from the difference between “transactions” and “actions”. The circulation transaction file stores data per transaction record, but a single transaction can consist of e.g. 5 individual loan actions or 6 individual payment actions.
For example, borrower X loans 3 items; this is considered to be 1 transaction made up of 3 actions. The record storage is based on transactions, but of course the statistics are based on the actions, so in our example the relevant data are the 3 actions and not the 1 transaction (which basically is a technical data storage issue).
If you look at savelists which are the results of selections, you will always see the number of transactions.
If you look at the snapshots, you will see the number of actions.
However, if you publish statistics (based on a snapshot) you will also see the number of actions.
141.6.2 Creating a statistical snapshot profile
One can create a statistical snapshot profile as follows:
Step 1: - On the overview screen of defined profiles, choose “New”.

Step 2: - The system will display an input form allowing one to define profile name, comments and the file to select from.
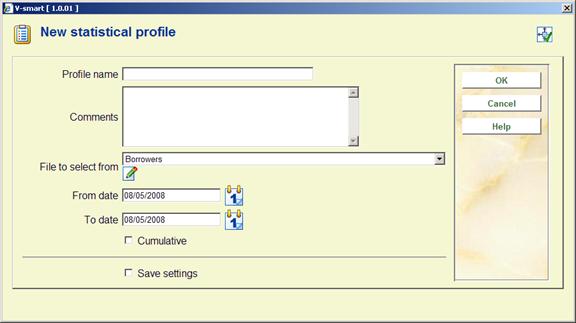
Give the profile a unique name and optionally add comments (this is particularly relevant if you manage a large number of profiles, as it will make it easier to select the correct profile from the total list). The “File to select from” determines from which sort of record IDs (“keys”) data will be stored in the snapshot. It does not imply that you cannot use data that is stored in other data files in the same profile.
The “From date”/”To date” properties are only relevant for data that is stored in chronological order (typically these are transaction files such as the circulation transaction file). The “From date” property indicates the start date of the snapshot and the “To date” property indicates the end date of the snapshot.
Check the Cumulative box if you want the data to be cumulated. This is only relevant for files that have a chronological storage, e.g. the circulation transaction file.
Step 3: – The system now switches to the overview screen of the profile which will be empty. Activate the “New criteria” button to add criteria to the snapshot.
Step 4: – Select the criteria that you want to include in the snapshot. Note that there is a maximum of 100 criteria per profile (see the introduction section for more information on this restriction).
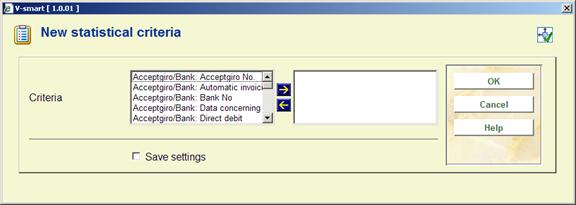
After the criteria have been selected, submit the form. The system returns to the overview screen of the profile. The profile is now complete.
Adding data elements from another data file
If you want to add criteria from another data file to the snapshot profile, you can use the . See below for more information.
141.6.3 Managing statistical snapshot profiles
Managing statistical snapshot profiles is grouped around three screens. The initial overview screen displays all the available profiles. From this screen a profile can be selected and then one of two detail screens can be accessed:
· If there are no snapshots attached to the profile (no snapshots have so far been created, or all the snapshots have been deleted), the system displays the criteria in the profile immediately and allows you to edit the profile.
· If there is at least one snapshot attached to the profile, the system displays a list of the attached snapshots and allows you to modify them; it is not possible to edit the profile itself.
The profile overview screen
The system displays a list of the snapshot profiles. The list contains the most important properties of each profile, such as application, name, status, comments, number of statistical criteria (how many data elements have been included in the profile) and the number of associated scan results (how many snapshots have been created using this profile).

The following options are available to manage the profiles.
|
* |
Select profile |
|
AS* |
Associated savelists |
|
B |
Previous page |
|
C* |
Copy profile |
|
F |
Next page |
|
I |
New profile |
|
L* |
Lock profile |
|
PW |
View profiles of another user |
|
S* |
Delete profile |
|
SC* |
Show criteria |
|
T* |
General properties |
|
UL* |
Unlock profile |
|
X* |
Execute statistics (create snapshot) |
Shortcuts that end with an asterisk (*) require the selection of an item on the screen.
The criteria overview screen
If there are no snapshots attached to the profile (no snapshots have so far been created, or all the snapshots have been deleted), the system displays the criteria in the profile immediately and allows you to edit the profile.
The system displays the list of criteria that are associated with the profile. The wording of each criterion is displayed.
The following options are available for managing the profile and its associated criteria.
|
* |
Change criteria |
|
B |
Previous page |
|
C |
Copy profile |
|
E |
Select elements from |
|
F |
Next page |
|
I |
New criterion |
|
S |
Delete profile |
|
S* |
Delete criterion |
|
T |
View / modify profile general properties |
|
V* |
Move criterion |
|
X |
Execute statistics (create snapshot) |
Shortcuts that end with an asterisk (*) require the selection of an item on the screen.
The snapshot overview screen
If there is at least one snapshot attached to the profile, the system displays the list of attached snapshots and allows you to modify them; it is no longer possible to edit the profile itself.
The system displays the list of snapshots. The list contains the most important properties of each snapshot; data and time when the snapshot was created, the number of records in the snapshot and the comments that were added to the snapshot at creation time.
The following options are available for managing the snapshots.
|
B |
Previous page |
|
C |
Copy profile |
|
F |
Next page |
|
O* |
Output of a snapshot |
|
S |
Delete profile |
|
S* |
Delete scan |
|
SC |
Show criteria |
|
T |
View / modify profile properties |
|
X |
Execute statistics (create snapshot) |
Shortcuts that end with an asterisk (*) require the selection of an item on the screen.
141.6.4 Copy a statistics profile
The Copy Statistics Profile feature can be used to copy profiles:
· To another name
· and/or
· To another user
Copying to another name will just create a duplicate profile. Copying to another user will create the profile for another user.
141.6.5 Lock / unlock a statistics profile
Statistics profiles can be locked by any user. This implies that the statistics profile cannot be modified anymore, not even by the person who locked it. The exceptions to this rule are users with system privileges, who can unlock the statistics profiles of any other user.
By using this option to lock profiles, one can be absolutely sure that their content and properties will not be changed.
Note however that locked profiles can be copied.
141.6.6 View the statistics profiles of another user
The statistics profiles of a user can be accessed by other user under certain conditions. Users with system privileges can access the statistics profiles of all other users. Other users can only access the statistics profiles stored under the fictitious user “General use” and under the fictitious user “Examples”. The statistics profiles stored as “Examples” can be copied to your own statistics profiles and you can then modify them if necessary.
141.6.7 Delete a statistics profile
If you delete a statistics profile, the associated snapshots will also be deleted. Therefore, when deleting a statistics profile, the system asks for a double confirmation; only then will the statistics profile will be removed from the system.
141.6.8 Run a statistics profile (create a snapshot)
If you “run” (execute) a statistics profile, the system displays a form that allows you to define the process parameters. Each statistics process that is to be run has a number of properties.

Process comments: This comment is added to the process. It is related to the process and not to the statistics profile nor to the snapshot. In the current version, there are no functions to view “Process comments” at a later stage.
Run profile on basic file: If you set this property to Yes, the system will create the snapshot based on a “basic file”, such as e.g. the borrowers file, the bibliographic file, the item file, and so on. You cannot set this property to Yes and select a savelist.
Run profile on savelist: This savelist contains the records that will be stored in the snapshot. You cannot select a savelist and set the “Run profile on basic file” property to Yes.
Run profile on associated savelist: Statistical snapshots can be created for a specific type of savelist, called an “associated savelist”. These are savelists that were previously used with the current selection profile. Associated savelists provide a quick and easy access to the savelist that are likely to be the most relevant ones. See the section on “Associated savelists” in the chapter on Savelists.
Result comments: This comment will be added to the snapshot.
After you have defined the necessary properties, the system switches to the standard form for starting processes. You can select whether you want to run the process online, as batch or in memory mode.
The result of this action is a new snapshot. The ID of the snapshot will be the date and time on which the snapshot creation process was started.
141.6.9 Output of a snapshot (create a statistical report)
Reports on the basis of a snapshot can be created in two places:
1. On the overview screen of snapshots
· Within the SSP menu option “Publish statistics”
This section only deals with the first option.
If you want to create a report on the basis of a snapshot, act as follows:
1. Select the snapshot you want to use.
2. Click on the button .
3. The system allows you to choose the statistical publishing profile that you want to use. Select one and submit the form.
4. The system allows you to define comments for the process.
5. The system switches to the standard form for Output device selection. Select the device you want to send the report to (e.g. Word, Excel, printer, etc.).
141.6.10 Change the general properties of a statistics profile
The system allows you to change the general properties of a statistics profile; the name of the profile and its comments. If you change the name, the system will ask for confirmation.
141.6.11 Add, delete and change criteria in a statistics profile
You can change a statistics profile as long as there are no snapshots attached to the profile. Once a snapshot has been created, it is no longer possible to modify the statistics profile.
Add criteria
If you want to add criteria to a statistics profile, the system will display a form that shows all the available criteria. Select the criteria that you want to include in the profile. Note that there is a maximum of 100 criteria per profile (see the introduction section for more information on this restriction).
Change criteria
If you want to change an individual criterion from the list, you can select the desired criterion. The system will display a form and allow you to replace the criterion with another one.
Move criteria
You can move criteria in a statistics profile as follows:
1. Select the criterion you want to move to another place in the list.
2. Activate the button.
3. Indicate to which place in the list the selected criterion should be moved. (Note that this results in a “Move”, not in a “Replace”.)
Delete criteria
You can delete criteria from a statistics profile. The system will ask for confirmation.
141.6.12 Show statistics criteria
The option invokes a pop-up window that displays all the available statistical criteria that are attached to the profile. If you click on the button of this pop-up window, the system re-displays the statistical criteria, but with additional details. For each criterion the following data is shown:
· ID of the criterion
· Wording of the criterion (in the current interface language)
· Format (e.g. date, text or numeric)
· Repeatable (Yes or No)
· Definition and comments (these are always in English)
141.6.13 Delete a snapshot
You can delete a snapshot. The system will ask for confirmation.
Once deleted, there is no way to recreate the data.
141.6.14 Change “file to select from”
If you want to add statistics criteria to a profile that are “located” in other data files than the one you are currently selecting from, you can use the option. The system will show you all files you can link to. Select a file. If you then add a new criterion, you will notice that the system now displays the data elements from the chosen file.
See the section on “Automatic links between files”.
The files that are available are determined as follows.
1. The system maintains a system file that contains all the links that are theoretically possible (e.g. file A has a link to file B; file B has a link to file C and so on).
2. The system automatically creates “iterative” links to other files. (For example: if you are selecting from file A, which has a link to file B, which in its turn has a link to file C, file C will also appear in the list of available link files).
See the section on Automatic file linking for an overview of the valid links between files.
141.7 Statistical reports
141.7.1 Introduction – Concepts and principles
Statistical reports consist of one or more statistical criteria, which are used to determine statistical data about a set of data. Such statistical reports can be generated on three types of data sets:
· A “snapshot” (see the chapter on statistics and snapshots)
· A “basic file” (e.g. the borrower file)
· A previous statistical report (the report is then only being re-published).
An example of a statistical report is (in natural language) e.g. “export to Excel all the borrowers in my database sorted by Place (from Address 1) and Gender”. Such reports consist of one or more tables that can be published in multiple formats (see next section).
Each profile can contain a maximum of 10 statistical criteria. The maximum on the X and Y axes of a table is 5 criteria each.
Formats of statistical reports
Statistical reports can have one of the following formats:
· Text (e.g. published by Word or sent directly to printer)
· Delimited (e.g. published by Excel)
· HTML (e.g. published in Internet Explorer)
· XML
The structure of statistical reports
The publishing of statistical reports (except the ones in XML) results in output that has the following structure.
File begin
Header text
Profile name
Profile comments
Profile general restrictions
Tables (1 to many) (*1)
Table restrictions (*2)
Table header
Table data
Table footer
Table restrictions (*2)
Footer text
File end
(*1) Note that the tables are repeatable.
(*2) Note also that the table restrictions are included either before or after the actual table data. This is defined in the profile parameters.
The actual statistical data is expressed as one or more tables in the report. See the next section for more information on tables.
You can create statistical publishing profiles that allow you to define each of these elements. The tables are mandatory; all other data (such as Profile name and Profile comments) is optional.
Each report consists of one or more tables
Each report consists of one or more tables (except for reports in XML). A table can have two formats; cascading and non-cascading.
A non-cascading display has an X and Y axis and looks as follows:
|
|
London |
Paris |
Honolulu |
|
Male |
4 |
5 |
12 |
|
Female |
5 |
5 |
0 |
|
Unknown |
12 |
56 |
7 |
The same data presented as cascading looks as follows:
|
Male |
London |
4 |
|
|
Paris |
5 |
|
|
Honolulu |
12 |
|
Female |
London |
5 |
|
|
Paris |
5 |
|
|
Honolulu |
0 |
|
Unknown |
London |
12 |
|
|
Paris |
56 |
|
|
Honolulu |
7 |
The X and Y axes do not necessarily have to coincide with (just) two statistical criteria. Both axes can contain (represent) multiple criteria. An example:
|
|
London|D |
London|T |
Paris|D |
Paris|R |
Honolulu|D |
Honolulu|T |
|
Male |
2 |
2 |
0 |
5 |
2 |
10 |
|
Female |
3 |
2 |
4 |
1 |
0 |
0 |
|
Unknown |
9 |
3 |
50 |
6 |
7 |
0 |
The X axis now contains a combination of two criteria (Place and Borrower Category; e.g. Place “London” and Borrower Category “D”, which is expressed as “London|D”). This type of combination can be made on both X and Y axes.
Restrictions
A statistical publishing profile can contain one or more restrictions. These can be used to restrict the output of statistical data to certain values. This can be applied in two ways. We will illustrate both with an example. We will create a statistical publishing profile that contains three criteria: Gender, Borrower Category and Place.
· Restriction type 1: – Restrict to a specific value
- Use the restriction to display only a specific value for one of the criteria. Example: display the combination of Borrower Category and Place, but [restriction] only with the Gender “female”. The display of data will then be restricted to “females”.
· Restriction type 2: – Restrict to all values
- Use the restriction to display a separate table for each value of a certain criterion. Example: display the combination of Borrower Category and Place, but [restriction] use all values of Gender as a restriction. This results in separate tables (per Borrower Category and Place) for each of the defined Gender values (Male, Female, and Unknown).
Up to five such restrictions can be defined (per profile).
A further example of restrictions
Another example will further clarify the function of restrictions:
One has created a statistical snapshot that contains three criteria; “Borrower Category”, “Borrower Gender” and “Borrower Address 1 Place”. The value on the X axis is “Borrower Category”; the value on the Y axis is “Borrower Gender”. We assume that there are five values for “Borrower Address 1 Place” in the database; London, Oxford, Rye, Brighton and Canterbury.
Case 1: - If no restriction values are defined all borrowers in the database are displayed in one table.
Case 2: - If the restriction value “Borrower Address 1 Place = Canterbury” is defined then only borrowers that have Canterbury as “Borrower Address 1 Place” in their record will be included in the table.
Case 3: - If the restriction flag “Use all defined values” is set to Yes, the system will display five tables, one for each of the five places in the database. Each table will display a division for “Borrower Category” and “Borrower Gender”.
Exception reporting (“boundaries”)
Exception reporting can be used to display only the values that fall outside of the “normal boundaries”. The exceptions can be expressed as [a] an absolute value, or [b] a value relative to the average, or [c] a value relative to the median. If a boundary is defined, the system will only display those rows or columns that conform to the defined boundary (and thus not only the cells that conform to the defined boundary).
Up to seven such boundaries can be defined (per profile).
Note: Please also read the introduction to the chapter on “Statistics and snapshots”.
141.7.2 Creating a statistical publishing profile
To create a statistical publishing profile, one can best use the profile creation wizard. The wizard will guide you through the most relevant settings and ask you to define the key elements of the profile. The process consists of several steps described in detail below.
Step 1: – Define the name of the profile and, optionally, attach comments to the profile.
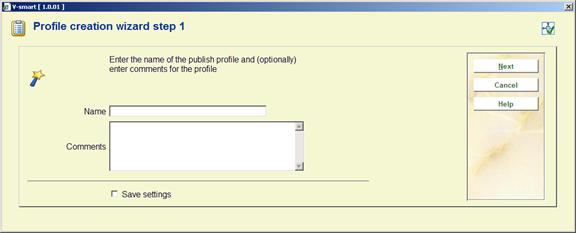
Step 2: – Define the file from which you want to select.
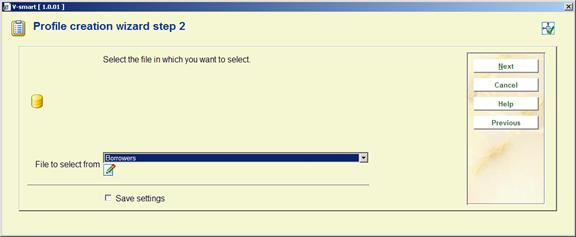
The choice of the file is important and cannot be modified after you have completed the wizard process. Note that the choice of the file does not limit your choice of (statistical) criteria to data elements from this file. The choice you make here basically means that you want to get figures about this type of record (in the example statistics about borrowers).
Step 3: – Define the profile type. The valid options are:
· Delimited text
· Text (not delimited)
· HTML
· XML
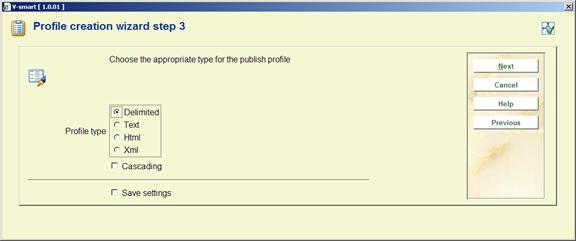
The following wizard screens depend on the value you chose in this step of the creation wizard process.
Step 4: – Define the type specific parameters.
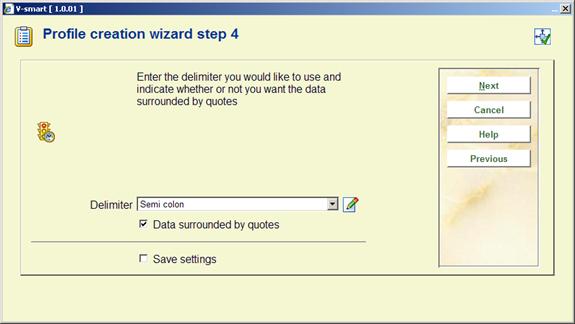
Note that this step of the creation wizard process depends on the type that was chosen in the previous step. The example we give here is for the type “Delimited”.
Step 5: – Define the values for the X and Y axes of the output.
You have to define at least one value for each axis; the maximum you can define are five criteria for the X axis and five for the Y axis. If you define more than five criteria for either the X or Y axis, the ones exceeding the maximum limit will be discarded. The values for the X and Y axes cannot be identical. If you are going to use the profile to report on data stored in a snapshot, you should not include criteria that were not in the profile that was used to create the snapshot.

If you want to include criteria from files other than the one selected in step 2, you can use the button. This is described in more detail in the section on “Change file to select from”.
Step 6: – Optionally, one can define so-called “restriction” criteria.
The system allows the definition of up to five restrictions. These restrictions will be applied to the output.
The last step of the wizard offers you the possibility of defining values for the restrictions you chose here in step 6.

If you want to include criteria from files other than the one selected in step 2, you can use the button. This is described in more detail in the section on “Change file to select from”.
Step 7: – Define the restriction values.
Per restriction (as defined in step 6 of the wizard process) you can define either a restriction value or a flag indicating that you want to use all the defined values as restrictions. Define one of these values for each of the restrictions you selected in step 6.
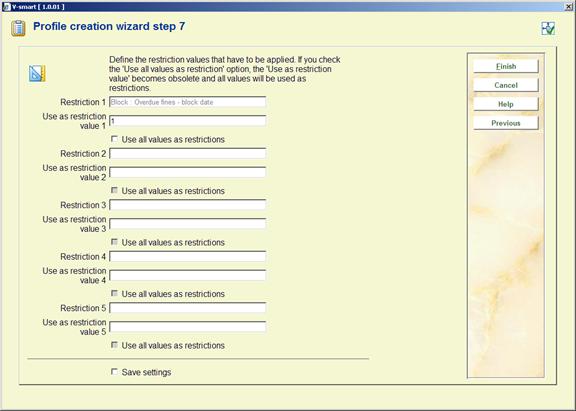
After you have answered these questions, you can the profile creation wizard process. The profile will be saved and subsequently be available for publishing reports.
141.7.3 Management of statistical publishing profiles
Options available for managing statistical publishing profiles
When managing statistical publishing profiles, the following actions and tools are available:
|
Option (button) |
Use this option to |
|
Creating a new statistical publishing profile |
Create a new profile manually |
|
Changing / updating statistical publishing profiles |
Delete or add criteria to a profile or view the properties of the profile |
|
Deleting statistical publishing profiles |
Delete a profile |
|
Copy statistical publishing profiles |
Copy publishing profiles between users and/or between applications |
|
Change the properties of publishing profiles |
Change the general properties of a profile |
|
Modify data elements |
Change, remove or move criteria for either the X or Y axis |
|
Wizard |
Create a new publishing profile by using the Profile Creation Wizard |
|
Lock / unlock a statistical publishing profile |
Lock or unlock a profile |
|
View / copy classes |
View the style classes that are attached to the elements of the profile / Copy the classes from another profile (this option is only available for HTML type profiles) |
|
View the page properties |
Change the page properties (this option is only available for text and delimited type profiles) |
|
View the statistical publishing profiles of another user |
Navigate to the profiles of another user; if you are allowed to use this option, you can then use those profiles as if they were your own |
|
Navigate to the associated snapshots |
View a list of associated snapshots |
|
Run a statistical publishing profile |
Execute a report |
We will describe a number of these actions in more detail in the following sections.
Workflow and organization of publishing profiles
Statistical publishing profiles management is organized on two main screens:
· The main (top level) screen displays a list of statistical publishing profiles and their most important properties (such as name, type, application, comments and others).
· The detail (second level) screen displays the criteria that are linked to the profile; it displays the restrictions and the boundaries. This overview screen gives access to all the properties of the profile.
Most options are available on both screens but not all. The following tables show an overview of which options are available on which screen.
Options available on the main screen
|
Shortcut |
Option |
|
* |
Select profile |
|
B |
Previous page |
|
C* |
Copy profile |
|
F |
Next page |
|
G* |
Go to associated snapshots |
|
I |
New profile |
|
L* |
Lock profile |
|
PW |
View profiles of another user |
|
S* |
Delete profile |
|
T* |
View / change general properties |
|
UL* |
Unlock profile |
|
W |
Profile creation wizard |
|
X* |
Create report |
Shortcuts that end with an asterisk (*) require the selection of a profile.
Options available on the detail screen
|
Shortcut |
Option |
|
* |
Change property |
|
C |
Copy profile |
|
CS |
Copy classes from |
|
E |
Select elements from |
|
G |
Go to associated snapshots |
|
L |
Lock profile |
|
M |
Modify data element(s) |
|
PP |
Page properties |
|
S |
Delete profile |
|
ST |
View classes |
|
T |
View / change general properties |
|
UL |
Unlock profile |
|
X |
Create report |
Shortcuts that end with an asterisk (*) require the selection of an item on the screen.
141.7.4 Creating a new statistical publishing profile manually
Note that in most cases it is advisable to create a new profile using the profile creation wizard.
Creating a new profile manually is a multi step process.
Step 1: – Define the general properties of the profile:

The general properties are:
·
Name: The name of the profile.
·
Comments: The comments that can be optionally added to the profile.
·
Profile type: The profile type (Delimited, HTML, Text or XML).
·
Cascading: Check this box if you want a Cascading display of the data.
·
File to select from: Indicate for which data file you want to generate data. Note that this does not imply that you can only select statistical criteria from this file. It basically implies that you want to generate data about the records in the selected file.
·
Store results: Check this box if you want to store the results. This has the advantage that if you want to re-display the same presentation, it will be generated faster.
Step 2: – Create values for the X and Y axes:
Define the values for the X and Y axes of the output. You have to define at least one value for both the X and Y axes; the maximum you can define are five criteria for the X axis and five for the Y axis. If you define more than five criteria for either the X or Y axis, the ones exceeding the maximum limit will be discarded. The values for the X and Y axes cannot be identical. If you are going to use the profile to report on data stored in a snapshot, you should not include criteria that were not in the profile that was used to create the snapshot.
Step 3: – The system now switches to the overview screen of the profile. You can now further modify it by, for example, adding restrictions or boundaries).
141.7.5 Copy a statistical publishing profile
The Copy Statistical Publishing profile feature can be used to copy profiles:
· To another name
· and/or
· To another user
Copying to another name will just create a duplicate profile. Copying to another user will create the profile for another user.
141.7.6 Lock / unlock a statistical publishing profile
Statistical publishing profiles can be locked by any user. This implies that the profile cannot be modified again, not even by the person who locked it. Users with system privileges are the exception to this rule and can unlock the profiles of any user.
This option for locking profiles enables one to be absolutely sure that their contents and properties will not be changed again.
However it is possible to copy locked profiles.
141.7.7 View the statistical publishing profiles of another user
The system allows, under special circumstances, certain users access to the statistical publishing profiles created by other users. Users with system privileges can access all other users' statistical publishing profiles. The other users can only access the statistical publishing profiles stored under the fictitious user “General use” and under the fictitious user “Examples”. The profiles stored as “Examples” can be copied to your own profiles; you can then modify the profile if required.
141.7.8 Delete a statistical publishing profile
When deleting a profile, the system will ask for confirmation. If confirmed, the profile will be removed from the system.
Note that related elements, such as classes and document headers, are not deleted when a statistical publishing profile is deleted.
141.7.9 Create a statistical report
If you create a statistical report (“run” a profile), the system displays a form that allows you to define the process parameters. Each publishing process that is started has a number of properties.
A report can be run on four types of files:
· An existing savelist
· The basic file (e.g. the borrowers file, the bibliographic database).
· An existing scan (a snapshot taken at an earlier point in time).
· An existing output result (e.g. a statistical report that was created earlier as the result of another statistical report creation action).
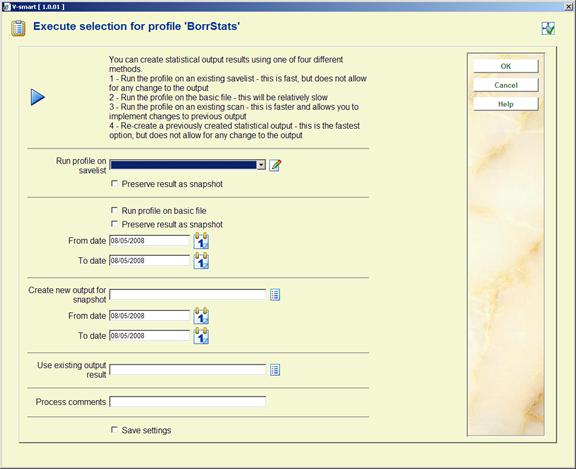
Method 1 – Run process on savelist
Run profile on savelist: Select a previously created savelist from the dropdown list.
Method 2 – Run process on basic file
Run profile on basic file: The report will be run on the “basic” file, e.g. “the borrowers file”, “the bibliographic database”, etc. This option is incompatible with the options “Create new output for snapshot” and “Use existing output result”.
Preserve result as snapshot: Check this box if you want to preserve the result of the report as a snapshot. This implies that the system will create a snapshot that can be re-used at a later stage to generate (other or identical) reports.
From date: The date in this field will be used as the starting point for the generation of the report. It is only relevant for files that are chronologically ordered (e.g. the circulation transaction file).
To date: The date in this field will be used as the end point for the generation of the report. It is only relevant for files that are chronologically ordered (e.g. the circulation transaction file).
Method 3 – Run process on snapshot
Create new output for snapshot: Select an existing snapshot from the list. The report will be run on this snapshot. This option is incompatible with the options “Run profile on basic file” and “Use existing output result”.
From date: The date in this field will be used as the starting point for the generation of the report. It is only relevant for files that are chronologically ordered (e.g. the circulation transaction file).
To date: The date in this field will be used as the end point for the generation of the report. It is only relevant for files that are chronologically ordered (e.g. the circulation transaction file).
Method 3 – Run process on existing output result
Use existing output result: Select an existing statistical report from the list. The report will be run on this stored report. This option is incompatible with the options “Run profile on basic file” and “Create new output for snapshot”. [If you store the output (for later re-use), changes to the output profile have no effect if you regenerate the old output. The output format that was saved is re-used again in its old format.]
Property that is available for all methods
Process comments: This comment is added to the process. It is related to the process and not to the publishing profile or the resulting savelist. In the current version, there are no functions to view these comments at a later stage.
141.7.10 Change the general properties of a statistical publishing profile
The system allows you to change the general properties of a statistical publishing profile. These are:
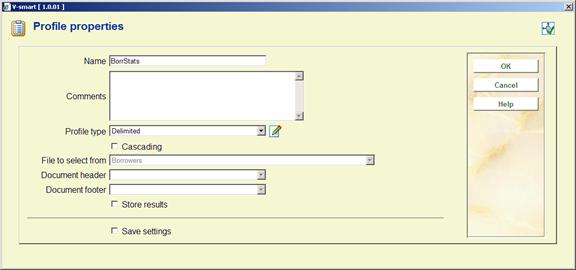
The general properties are:
· Name: The name of the profile.
· Comments: The comments that can optionally be added to the profile.
· Profile type: The profile type (Delimited, HTML, Text or XML).
· Cascading: Check this box if you want a cascading display of the data.
·
File to select from: This is the file for which the statistical report will be generated. It cannot be modified.
·
Document header: This text will be displayed at the beginning of the document (report). It should not be confused with the page header, which is displayed on every page. Note that this property can only be defined / modified for profiles of the type HTML and Text.
·
Document footer: This text will be displayed at the end of the document (report). It should not be confused with the page footer, which is displayed on every page. Note that this property can only be defined / modified for profiles of the type HTML and Text.
·
Store results: Check this box if you want to store the results. This has the advantage that if you want to re-display the same presentation, it will be generated faster.
Note that not all properties apply to all profile types. If not applicable, the options are greyed out.
If you change the name, the system will ask for confirmation.
You must be aware of the fact that there are restrictions to changing the profile type. You must also realize that if you change a profile type from type A to type B, you cannot necessarily change it back to type A.
141.7.11 Change the profile element properties
The properties of a profile can be grouped into four types:
· General properties
· Criterion properties
· Restriction properties
· Boundary properties
The different property groups can be accessed by clicking on the corresponding line of the profile overview screen.
General properties
The following general properties can be set:
|
Include profile name |
Set this value to Yes if one wants to include the profile name in the output. |
|
Include general restrictions |
Set this value to Yes if one wants to include the general restrictions of the profile in the output. |
|
Include comments |
Set this value to Yes if one wants to include the profile comments in the output. |
|
Include specific restrictions for each table |
If there are specific restrictions, they will be included for each table in the output, either as a table footer or as a table header. |
|
Include percentages |
One can choose whether the system has to include percentages. Valid values are None (no percentages), Only (only percentages), Before (before the actual value) and After (after the actual value). |
|
Justify percentages |
One can set how percentages should be justified. |
|
Include totals |
One can define whether the output has to include totals for each column and row. |
The general properties form looks as follows:
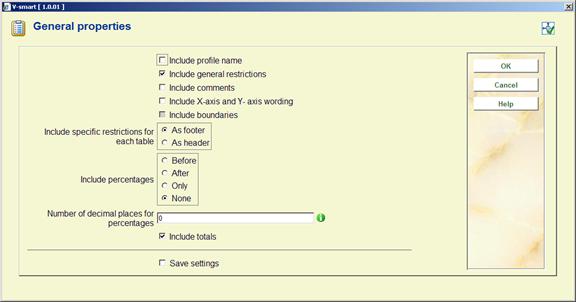
Criterion properties (X- and Y-axes properties)
You can set a number of properties for the statistical criteria in the profile. (These map to the data that will be displayed on both the X- and Y-axes.) These properties are identical or similar to the properties that one can set in standard (i.e. non statistical) publishing profiles.
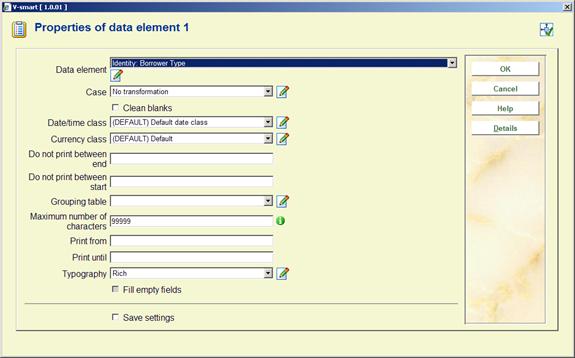
Data element: The data for which statistical data has to be published (e.g. the name of a borrower, the title of a bibliographic description, the last checkout date of an item, etc.).
You can use the Details button on the form to view the primary characteristics of the Data element.
Case: This property can be used to transform the case to uppercase or lowercase.
Clean blanks: This property can be used to clean the data (remove all leading, trailing and double blanks).
Date / time class: The date / time class that is to be used to format a date or time.
Do not print between end: This property can be used to exclude certain parts from the data to be published.
Do not print between start: This property can be used to exclude certain parts from the data to be published.
Grouping table: Select a grouping table from the list.
Maximum number of characters: The maximum number of characters to be included.
Print from: This property can be used to exclude certain parts from the data to be published.
Print until: This property can be used to exclude certain parts from the data to be published.
Typography: This property can be used to transform the typography (e.g. from “rich” to “poor”, which will transform all diacritics, e.g. “Böll” to “Boll”). The property is currently not in use.
Restriction properties
You can define up to five restrictions that will be applied to the statistical report. Each of these restrictions has its own set of properties:

The properties that are defined here are applied as follows:
Step 1: – The data (as defined in the property Data element) is retrieved.
Step 2: – This data is then modified according to a number of formatting properties.
Step 3: – The modified data is then used as a restriction value.
Data retrieval properties (step 1)
Data element: The data for which statistical data is to be published (e.g. the name of a borrower, the title of a bibliographic description, the last checkout date of an item, etc.).
Note that you can use the button on the form to view the primary characteristics of the Data element.
Formatting properties (step 2)
Case: This property can be used to transform the case to uppercase or lowercase.
Clean blanks: This property can be used to clean the data (remove all leading, trailing and double blanks).
Date / time class: The date / time class that is to be used to format a date or time. Please see the remark about the relationship between Date / time classes and Grouping tables in the description of the Grouping table property.
Do not print between end: This property can be used to exclude certain parts from the data to be published.
Do not print between start: This property can be used to exclude certain parts from the data to be published.
Grouping table: Select a grouping table from the list. If you include both a grouping table and a date/time class, you should be aware of the fact that the date/time setting will overrule the grouping table. In other words if you want e.g. to group dates on weekdays (all Mondays, all Tuesdays, etc.), you should use the grouping table Weekdays and not include a date/time class.
Maximum number of characters: The maximum number of characters to be included.
Print from: This property can be used to exclude certain parts from the data to be published.
Print until: This property can be used to exclude certain parts from the data to be published.
Typography: This property can be used to transform the typography (e.g. from “rich” to “poor”, which will transform all diacritics, e.g. “Böll” to “Boll”). The property is not currently in use.
Restriction value properties (step 3)
Restriction value: The value in this field will be used as the restriction value. The operator used for the restriction is “equal to”. See the section on restrictions in the introduction of this chapter for more information.
Example: if you select the Data element “Date of Birth” from the Borrower file and set the Restriction value to “10/09/1961”, only borrowers that have a data of birth equal to 10/09/1961 will be included in the statistical report.
Restriction for all values: If this value is set to Yes, all values will be used as a restriction. If we take the previous example: if you set this property to Yes, the system will show a separate report for each data of birth. See the section on restrictions in the introduction of this chapter for an explanation of this mechanism.
Note that you must define a “Restriction value” or set the “Restriction for all values” parameter to Yes. You cannot define a “Restriction value” and set the “Restriction for all values” parameter to Yes.
: The form contains a button that can be used to remove the restriction.
Boundary properties
“Boundary properties” are used to define one or more boundaries for the statistical report. Boundaries enable exception reporting; the report will be restricted to only those data values that fall outside of the defined boundaries. See the section on “Boundaries” in the introduction of this chapter.

A boundary is expressed by defining four properties:
Apply to: The boundary can be applied to three data elements; a cell, a column or a row. If “cell” is chosen, each individual cell is evaluated; if “column” is chosen, the total value of the column is evaluated; if “row” is chosen, the total value of the row is evaluated.
Operator: Two operators are available; “Higher than” and “Lower than”.
Value: This is the value that will be applied to the data element defined in the “Apply to” property.
Value type: You can choose from three Value types; Absolute value, Percentage of average and Percentage of median.
Example 1
Apply to: Cell
Operator: Higher than
Value: 12
Value type: Absolute value
The result of the expression will be that all the cells that have a value higher than 12 will be included in the report. Note that the report will not only show the cell (X) that is evaluated positively, but all the cells of the row and column of cell X.
Example 2
Apply to: Row
Operator: Lower than
Value: 10
Value type: Percentage of average
The result of the expression will be that all the rows that have a value lower than 10% of the average will be included in the report.
Example 3
Apply to: Column
Operator: Higher than
Value: 20
Value type: Percentage of median
The result of the expression will be that all the columns that have a value higher than 20% of the median will be included in the report.
141.7.12 Change the page properties
The system allows you to change the page properties. The page properties depend on the profile type.
Profile type: Text
The following page properties can be modified:
· Column width
· Column width of the first column
· Characters per line
· Start a new page for every table
· Start a new page for every restriction

Column width: This value determines the width of all the columns, except the first one.
Column width of first column: This value determines the width of the first column.
Start new page for every table: If the report contains multiple tables, you can set this value to Yes if you want to publish each table on a new page.
Start new page for every restriction: If the report contains restrictions, you can set this value to Yes if you want to start a new page for each new restriction.
Profile type: Delimited
The following page properties can be modified:
· Delimiter
· Data surrounded by quotes

The page properties of the profile type “Delimited” are similar to the ones that are defined in standard (i.e. non statistical) publishing profiles. These properties basically ensure a smooth integration with applications such as MS Excel.
141.7.13 Add, delete or move criteria in a statistical publishing profile
You can add, delete or move elements in a publishing profile as follows:
1. Activate the “Modify data elements” button.
2. The system displays the criteria that are defined for the X and Y axes. You can now add, delete or move criteria.
Note that at least one criterion must be defined for both the X and the Y axis to have a usable profile. If you add more than five criteria to either the X or Y axis, the system will only store the first five; the others will be discarded.
141.7.14 Change style classes
For reports of the HTML type, style classes can be applied. For each distinct element of a statistical report you can define a style class. You can choose from the list of defined style classes. The following elements can have an individual style class:
Document: The report as a whole.
Document header: The header of the document.
Document restriction: The restriction(s) that apply to the document (report) as a whole.
Document boundary: The boundary (boundaries) that apply to the document.
Document comments: The comments that are attached to the document (report).
Document X-axis and Y-axis wording: The wording of the X and Y axes.
Table X-axis header: The header of the X-axis (the header values).
Table Y-axis header: The header of the Y-axis (the header values).
Table restrictions: The restrictions that apply to an individual table.
Table cells absolute values: The absolute values as presented in an individual table.
Table cells percentage values: The percentage values as presented in an individual table.
Table totals on X-axis: The totals of the X-axis (rows).
Table totals on Y axis: The totals of the Y-axis (columns).
Table total general: The total value of the table (the value presented in the cell that is the intersection of the X-axis totals and the Y-axis totals).
141.7.15 Go to associated snapshots
The system will switch to the snapshots that are “associated” with the statistical publishing profile. These are snapshots that are created during the reporting process and that can be re-used to generate reports with the current statistical publishing profile.
141.7.16 Change “file to select from”
If you want to update a profile with criteria that are “located” in other data files than the one you are currently selecting from, you can use the “Change File to Select From” option. The system will show you all the files you can link to. Select a file. If you then add a new criterion, you will notice that the system now displays the data elements from the chosen file.
See the section on Automatic links between files.
The files that are available are determined as follows:
1. The system maintains a system file that contains all the links that are theoretically possible (e.g. file A has a link to file B; file B has a link to file C).
2. The system automatically creates “iterative” links to other files. (Example: If you are selecting from file A, which has a link to file B, which in its turn has a link to file C, file C will also appear in the list of available link files).
See the section on Automatic file linking for an overview of the valid links between files.
141.7.17 Publish examples
The first example is a direct output of data to Excel. The output type is “Delimited”.

The second example is a direct output to Word. The output type is “Text”.

The third example is a direct output to Internet Explorer. The output type is “HTML”.

The fourth and last example is a direct output to Internet Explorer. The output type is “XML”.

141.8 Related tools
141.8.1 Introduction
To support the core SSP functionality (select, sort, publish and statistics), the system offers a set of tools that can be used to implement the desired functionality. Most of these tools are related to the publishing of data.
These tools are:
· Grouping tables
· Style classes
· Date / time classes
· Document texts
· Page texts
· Automatic savelists for bibliographic records
· Automatic savelists for authorities
141.8.2 Grouping tables
Grouping tables are used to group data. They can be either automatic or user-defined. This allows e.g. grouping of borrowers on age or age categories, allows automatic transformations of dates into months or years, or for that matter any user-defined transformation of text.
A manual grouping table contains entries such as “transform the code X to the wording ‘All others'”.
Note that a grouping table can be a combination of automatic and manual entries.
“Automatic” grouping principles
Grouping tables can contain so-called “automatic grouping principles”. These precede the “manually defined grouping” table entries, and are in fact evaluated before any manually defined grouping principle.
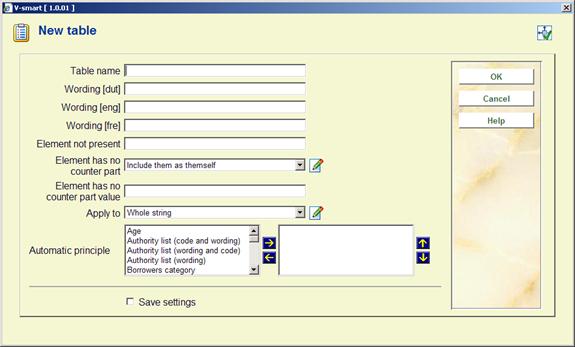
Note that automatic grouping tables can be combined (see the screen example) and that they can also be followed by manual entries in the grouping table. The screen example contains two automatic grouping tables, Age and Groups of 10. If we would like to have an overview of borrowers' age presented in groups of 10 (1-10, 11-20, 21-30 and so on) you would have to apply both criteria. “Age” will convert the borrower's date of birth to his/her age and “Groups of 10” would then group the ages into categories of 10. [See the next table for more information on each automatic grouping principle.]
The overview screen of grouping tables now mentions the number of manual entries in a table, followed by the number of automatic principles (see screen capture for an example).

Overview of automatic grouping principles
The following automatic grouping principles are available:
|
Automatic grouping principle |
Explanation |
|
Age |
Transforms a date to age; the output is a numeric value; if the input is an invalid date, the output is “” (nothing). |
|
Authority list (code and wording) |
Transforms an authority list code to the code and its (language dependant) wording, based on the parameters defined in AFO 482; section “Borrower Definition Settings”. |
|
Authority list (wording) |
Transforms an authority list code to its (language dependant) wording, based on the parameters defined in AFO 482; section “Borrower Definition Settings”. |
|
Authority list (wording and code) |
Transforms an authority list code to its (language dependant) wording and the code, based on the parameters defined in AFO 482; section “Borrower Definition Settings”. |
|
Borrower category |
Transforms a borrower category to its (language dependant) wording. |
|
Day of month |
Transforms a date to the day of the month (1, 2, 3 … 31). |
|
Groups of 10 |
Transforms a value to a numeric value in groups of 10, i.e. (0, 1-10, 11-20, 21-30 and so on). |
|
Groups of 100 |
Transforms a value to a numeric value in groups of 100, i.e. (0, 1-100, 101-200, 201-300 and so on). |
|
Groups of 1000 |
Transforms a value to a numeric value in groups of 1000, i.e. (0, 1-1000, 1001-2000, 2001-3000 and so on). |
|
Groups of 10000 |
Transforms a value to a numeric value in groups of 10000, i.e. (0, 1-10000, 11-20000, 21-30000 and so on). |
|
Groups of 100000 |
Transforms a value to a numeric value in groups of 10000, i.e. (0, 1-100000, 11-200000, 21-300000 and so on). |
|
Groups of 1000000 |
Transforms a value to a numeric value in groups of 100000, i.e. (0, 1-1000000, 11-2000000, 21-3000000 and so on). |
|
Groups of 20 |
Transforms a value to a numeric value in groups of 20, i.e. (0, 1-20, 21-40, 41-60 and so on). |
|
Groups of 200 |
Transforms a value to a numeric value in groups of 200, i.e. (0, 1-200, 201-400, 401-600 and so on). |
|
Groups of 2000 |
Transforms a value to a numeric value in groups of 2000, i.e. (0, 1-2000, 2001-4000, 4001-6000 and so on). |
|
Groups of 25 |
Transforms a value to a numeric value in groups of 25, i.e. (0, 1-25, 26-50, 51-75 and so on). |
|
Groups of 250 |
Transforms a value to a numeric value in groups of 250, i.e. (0, 1-250, 251-500, 501-750 and so on). |
|
Groups of 2500 |
Transforms a value to a numeric value in groups of 2500, i.e. (0, 1-2500, 2501-5000, 5001-7500 and so on). |
|
Groups of 25000 |
Transforms a value to a numeric value in groups of 25000, i.e. (0, 1-25000, 25001-50000, 50001-75000 and so on). |
|
Groups of 250000 |
Transforms a value to a numeric value in groups of 250000, i.e. (0, 1-250000, 250001-500000, 500001-750000 and so on). |
|
Groups of 5 |
Transforms a value to a numeric value in groups of 5, i.e. (0, 1-5, 6-10, 11-15 and so on). |
|
Groups of 50 |
Transforms a value to a numeric value in groups of 50, i.e. (0, 1-50, 51-100, 101-150 and so on). |
|
Groups of 500 |
Transforms a value to a numeric value in groups of 500, i.e. (0, 1-500, 501-1000, 1001-1500 and so on). |
|
Groups of 5000 |
Transforms a value to a numeric value in groups of 5000, i.e. (0, 1-5000, 5001-10000, 10001-15000 and so on). |
|
Groups of 50000 |
Transforms a value to a numeric value in groups of 50000, i.e. (0, 1-50000, 50001-100000, 100001-150000 and so on). |
|
Groups of 500000 |
Transforms a value to a numeric value in groups of 500000, i.e. (0, 1-500000, 500001-1000000, 1000001-1500000 and so on). |
|
Hours |
Transforms a time value to hours (e.g. 0 = 00:00-00:59, 1 = 01:00-01:59 … 12 = 12:00-12:59, 13 = 13:00-13:59 … 23 = 23:00-23:59). |
|
Material type |
Transforms a material type code to its wording; the system first searches for a language dependant wording, if that is not available, the system will select the default wording. |
|
Months numeric |
Transforms a date to a month expressed as a numeric value (1 = January, 2 = February … 12 = December). |
|
Month/Year |
Transforms a date to a month expressed as a numeric value followed by a slash and the year expressed as a four digit value (e.g. 1/2003, 2/2003 … 12/2003). |
|
Numeric |
Transforms a string to a numeric value (e.g. 0, 1, 1.5, 25, 37.52). Note that all strings starting with a non numeric character are transformed to 0 (e.g. “cat” is transformed to 0) and that strings starting with a numeric value are transformed to the starting numeric value (e.g. “1cat” is transformed to 1). |
|
SISO group |
Transforms a SISO code to a SISO group; this is basically the first two digits of the numeric part of the SISO code, with some exceptions such as 399, 614, 616, 620, 624, 627, 630, and 639. |
|
SISO major group |
Transforms a SISO code to a SISO major group; these are 000, 100, 200, 300, 340, 390, 399, 410, 430, 500, 600, 620, 630, 640, 700, 780, 800, 900 and 950. |
|
UDC group |
Transforms a UDC code to a UDC group; this is the first two digits of the UDC code. |
|
UDC major group |
Transforms a UDC code to a UDC major group; this is the first digit of the UDC code. |
|
Weekdays |
Transforms a date to a weekday (e.g. 1 = Monday, 2 = Tuesday …, 7 = Sunday). |
Locking and unlocking grouping tables
Grouping tables can be locked and unlocked. They follow the same logic as selection, sorting and publishing profiles.
141.8.3 Classes
Introduction
A class is a group of formatting properties. Classes are not related to just one profile, but can be shared amongst all profiles.
Classes can be either private (i.e. only be used by its creator) or common (i.e. shared by all users).
Note also that classes are not application related, i.e. they can be used in all applications.
There are three types of classes; one for layout properties (whose usage is restricted to HTML output), one for date / time conversions (which can be used for all types of output) and one for amounts..
Overview of class profiles
The overview of class profiles is slightly different for each profile.
For style class profiles and amount profiles, the system only displays the name and the wording of the profile.
For date / time conversion, there is an additional column that displays the current date in the format as defined by the profile.
Options
The system displays the list of defined classes and you can use one of the following options to manage the classes:
|
.* |
View / change properties of class |
|
B |
Previous page. |
|
C* |
Copy class; classes can be copied to another name and / or to another user. |
|
F |
Next page. |
|
I |
New class. |
|
PW |
View the classes of another user; a user with system privileges can switch to the classes of all the other users; all other users can switch to non-private (“Shared”) classes and to the classes defined for the user “Example”. |
|
S* |
Delete class; the system will ask for confirmation If classes are still attached to publishing or statistical publishing profiles, they cannot be deleted and the system will display a warning. |
|
X |
Switch class type (this is a toggle mode). Note that if you want to create a certain class type, you must first switch to that one before choosing theoption New. |
The options that end with an asterisk (*) can only be used after the selection of an item from the list.
Layout classes
Layout classes can be used for HTML output and allow the definition of styles, without having to know anything about HTML syntax. The following properties can be defined for each class:
· Bold
· Italics
· Underline
· Position
· Font
· Font size
· Colour
· Border
The criteria can be defined as follows:
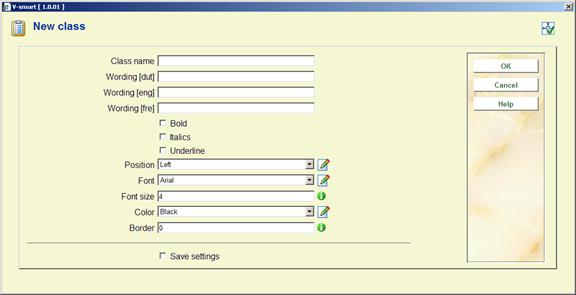
Date / time classes
Date / time classes can be used to format date and / or time. The following properties can be defined for each class:

Currency classes
Currency classes can be used to format amounts. For instance: A comma in stead of a dot, and 2 decimals behind the dot, even when the amount is for instance 1.1. (So the class should transform 1.1 as 1,10) The following properties can be defined for each class:

141.8.4 Texts (document and page texts)
Introduction
The system also allows the definition of all kinds of texts that can be integrated into publishing profiles. Free texts can be defined and integrated into “HTML type” or” Text type” publishing profiles.
These “Texts” can then be integrated as page headers or footers, or as elements to be included in the body of the published document.
There are two types of document texts; document header and document footer. There are three types of page texts; page header, page footer and page text block.
The functionality is not restricted to purely text only, but also allows inclusion in the published document of:
· Empty line
· Page counter
· Print date
· Print time
· Printed by
· Profile name
· Record counter
· Savelist name
· Sorting criteria 1 to 5
Overview of text profiles
The overview of text profiles displays the name and the wording of the profile.
Options
The system displays the list of defined text profiles and you can use one of the following options to manage the profiles:
|
* |
View / change the properties of a profile |
|
B |
Previous page. |
|
C* |
Copy profile; profiles can be copied to another name and / or to another user. |
|
F |
Next page. |
|
I |
New class. |
|
PW |
View the profiles of another user; a user with system privileges can switch to the profiles of all of the other users; all other users can switch to non-private (“Shared”) profiles and to the profiles defined for the user “Example”. |
|
S* |
Delete profile; the system will ask for confirmation. If a text profile is still attached to publishing or statistical publishing profiles, it cannot be deleted and the system will display a warning. |
|
X |
Switch profile type; you can select another profile type from the list. |
The options that end with an asterisk (*) can only be used after the selection of an item from the list.
Document text profiles
If you select a profile from the list, the system will first display the Name and (language dependant) Wording of the profile. After you submit the form, the system displays an extended text box and you can modify the text.
Note that if you are going to use the text profile in an HTML type publishing profile, you can insert HTML tags into the text box.
Page text profiles
Page text profiles can be used in page headers or footers, and, in fact, anywhere on the page. After you select a page text profile, the system will display a form that allows you to define the following properties:
· Profile name.
· Profile wording (language dependant).
· 1 to 15 “items”.
· The order of the items.
For each item you can select from a list of valid options:
· Line (a blank line).
· Page counter.
· Print date (the date on which the document is printed).
· Print time.
· Printed by (the wording of the user that started the print action).
· Profile name (the name of the publishing profile).
· Record counter (the record counter; this counter is increased for each record that is included in the output).
· Savelist name.
· Sorting criteria 1 to 5.
You can use the “order” property to change the order in which the items are displayed. Items must be separated by commas.
141.8.5 Automatic storage of records in savelists
Introduction
Records can be stored in savelists automatically, according to profiles that you can define as part of SSP. This allows the automatic storage in a savelist of e.g. all new records, records created by a specific user of the system, etc.
You can define as many profiles as you want. Each profile will then automatically generate one or more savelists.
Overview of profiles
The overview of text profiles displays the name and the comments of the profile.
Options
The system displays the list of defined profiles and you can use one of the following options to manage the profiles:
|
* |
View / change the properties of a profile |
|
B |
Previous page. |
|
F |
Next page. |
|
I |
New class. |
|
S* |
Delete profile; the system will ask for confirmation. |
The options that end with an asterisk (*) can only be used after selection of an item from the list.
Profile properties
Each profile can have the following properties.
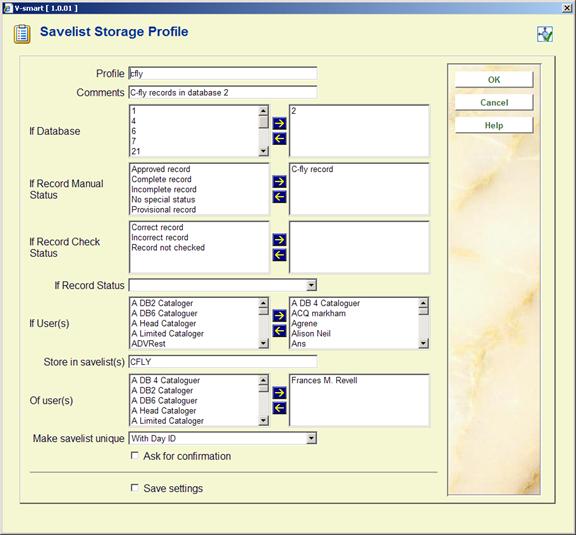
Profile ID: The name of the profile.
Comments: The comments of the profile.
If database: Only records from the checked database(s) will be added to the savelist.
If record manual status: Only records that have the selected manual record status(es) will be added to the savelist.
If record check status: Only records that have the selected record check status(es) will be added to the savelist.
If record status: Only records that have the selected record status(es) will be added to the savelist.
If user(s): Only records added / modified by the selected user(s) will be added to the savelist.
Store in savelist(s): The name of the savelist in which the records will be stored.
Of user(s): The user(s) for whom the savelist will be stored.
Make savelist unique: The savelist name can be made unique using one of the following mechanisms:
· With Day ID
· With Week ID
· With Month ID
· With Year ID
· None
These settings result in a savelist per day, per week, per month or per year. The last option implies that no differentiation is made and that all the records are stored in the same savelist.
Ask for confirmation: Set this property to Yes, if the system is to ask for confirmation every time it wants to store a record in the selected savelist.
Example
The previous screen capture shows a profile that has the following properties defined:
If record status: – New
If user(s): – Agrene [and others; see screen example]
Store in savelist: – UMSUBJECTS
Of user: – Big Brother
Make savelist unique: – With Day ID
This implies that new records created by user Agrene [and others] are stored in the savelist UMSUBJECTS of user Big Brother. The “Make savelist unique” property value of “With Day ID” results in the creation of a unique savelist for each day on which at least one record has been created by user Agrene [or one of the other selected users in the list].
Standard automatic savelists
When new items are added to the system. a trigger will automatically add the item or the related bibliographic record to a set of savelists. This automatic savelist can then be used to count the number of items or bibliographic records that have been added within a specific period (month or year). The savelists are stored under the fictitious user login "AAA" (user name “Automatic Savelists”).
The trigger creates the following savelists:
·
[application bib] BibRecords.FirstItem. + Month: stores the bib record when a first item is added to the bib record
·
[application bib] BibRecords.FirstItem. + Year: same per year
·
[application item] Item.FirstItem + Month: stores the item record if it is added as the first item on the bib record
·
[application item] Item.FirstItem + Year: same per year
·
[application item] Item.NewItem + Month: any new item record
·
[application item] Item.NewItem + Year: same per year
Month is in the format MM/YYYY, years is in the format YYYY.
Note
Barcoding received issues of serials does NOT count as adding a new item.
141.9 Miscellaneous information
141.9.1 Example profiles
When installed, the system is delivered with a number of “example” profiles. These profiles cannot be modified, but they can be copied to a shared or personal profile, after which they become regular profiles and there are no further restrictions on editing them.
The following “example” selection profiles are supplied with the system:
|
Application |
Profile name |
Profile comments |
|
Bibliographic descriptions |
Books.ThisYear.Materialtype |
Books created this year with a specific material type. |
|
Bibliographic descriptions |
Cat.Loans.Woman.ByAge |
Selection on Item category BO, borrowed by women aged 30-40. |
|
Bibliographic descriptions |
New.Records.Today |
New bibliographic records created today by user. |
|
Bibliographic descriptions |
Unimarc.All.Articles.By.Inst |
All articles by institution. |
|
Bibliographic descriptions |
Unimarc.New.Articles.Today |
All new articles today. |
|
Borrowers |
ActBorr.Postcode.Age.Location |
Active borrowers, Postcode. |
|
Borrowers |
ActiveBorrowers2004 |
Active borrowers 2004. |
|
Borrowers |
DueDate loan |
Due date loan today. |
|
Borrowers |
Postcode |
Select on postcode. |
|
Items |
Items.3th.Overdue.ThisYear |
All items 3rd claim sent this year. |
The following “example” sorting profile is supplied with the system:
|
Application |
Profile name |
Profile comments |
|
Items |
Items.Inst/Loc |
Sort items by institution and location. |
The following “example” publishing profiles are supplied with the system:
|
Application |
Profile name |
Profile comments |
|
Bibliographic descriptions |
Author.ISBD.Shelfmark |
Overview of bibliographic records by author, ISBD and shelfmark. |
|
Bibliographic descriptions |
Catalog.ISBD |
Default overview of catalogue. |
|
Bibliographic descriptions |
Holdingslist |
Holdings list. |
|
Bibliographic descriptions |
ISBD.Cards |
ISBD cards. |
|
Bibliographic descriptions |
List.of.acquisitions |
List of acquisitions. |
|
Bibliographic descriptions |
New.Records.Today |
New bibliographic records created today per user. |
|
Bibliographic descriptions |
Subjectheadinglist |
Subject heading list. |
|
Bibliographic descriptions |
Unimarc.Subject.ISBD.Shelfmark |
Overview of bibliographic records by subject, ISBD and shelfmark. |
|
Borrowers |
Borrowers.Mailing |
Borrowers being mailed through Excel and Word. |
|
Borrowers |
Borrowers.NCP |
Borrowers Name, City and Postcode. |
|
Items |
Title.Barcode.Shelfmark.DD |
Overview items with title, barcode, shelfmark and due date. |